Architecture Overview
Airflow is a platform that lets you build and run workflows. A workflow is represented as a Dag (a Directed Acyclic Graph), and contains individual pieces of work called Tasks, arranged with dependencies and data flows taken into account.

A Dag specifies the dependencies between tasks, which defines the order in which to execute the tasks. Tasks describe what to do, be it fetching data, running analysis, triggering other systems, or more.
Airflow itself is agnostic to what you’re running - it will happily orchestrate and run anything, either with high-level support from one of our providers, or directly as a command using the shell or Python Operators.
Airflow components
Airflow’s architecture consists of multiple components. The following sections describe each component’s function and whether they’re required for a bare-minimum Airflow installation, or an optional component to achieve better Airflow extensibility, performance, and scalability.
Required components
A minimal Airflow installation consists of the following components:
A scheduler, which handles both triggering scheduled workflows, and submitting Tasks to the executor to run. The executor, is a configuration property of the scheduler, not a separate component and runs within the scheduler process. There are several executors available out of the box, and you can also write your own.
A Dag processor, which parses Dag files from a Dag bundle and serializes them into the metadata database. More about processing Dag files can be found in Dag File Processing
A Dag bundle, which is configured for the Dag processor to parse Dag files from and allow workers to access the correct version of the Dag file. By default, this is a local folder on disk. More about Dag bundles can be found in Dag Bundles
An API Server, which serves the REST API and presents a user interface to inspect, trigger and debug the behaviour of Dags and tasks. The API server is also used by tasks using the task SDK to communicate state back to Airflow, without requiring direct access to the metadata database.
A metadata database, usually PostgreSQL or MySQL, which stores the state of tasks, Dags and variables.
Setting up a metadata database is described in Set up a Database Backend and is required for Airflow to work.
Optional components
Some Airflow components are optional and can enable better extensibility, scalability, and performance in your Airflow:
Optional worker, which executes the tasks given to it by the scheduler. In the basic installation worker might be part of the scheduler not a separate component. It can be run as a long running process in the CeleryExecutor, or as a POD in the KubernetesExecutor.
Optional triggerer, which executes deferred tasks in an asyncio event loop. In basic installation where deferred tasks are not used, a triggerer is not necessary. More about deferring tasks can be found in Deferrable Operators & Triggers. Note that Human-in-the-loop tasks wait in the scheduler-managed
awaiting_inputstate and do not use the triggerer.Optional folder of plugins. Plugins are a way to extend Airflow’s functionality (similar to installed packages). Plugins are read by the scheduler, Dag processor, triggerer and API server. More about plugins can be found in Plugins.
Deploying Airflow components
All the components are Python applications that can be deployed using various deployment mechanisms.
They can have extra installed packages installed in their Python environment. This is useful for example to install custom operators or sensors or extend Airflow functionality with custom plugins.
While Airflow can be run in a single machine and with simple installation where only scheduler, Dag processor and API server are deployed, Airflow is designed to be scalable and secure, and is able to run in a distributed environment - where various components can run on different machines, with different security perimeters and can be scaled by running multiple instances of the components above.
The separation of components also allow for increased security, by isolating the components from each other and by allowing to perform different tasks. For example separating Dag processor from scheduler makes sure that the scheduler does not have access to the Dag bundles and cannot execute code provided by Dag author.
Also while single person can run and manage Airflow installation, Airflow Deployment in more complex setup can involve various roles of users that can interact with different parts of the system, which is an important aspect of secure Airflow deployment. The roles are described in detail in the Airflow Security Model and generally speaking include:
Deployment Manager - a person that installs and configures Airflow and manages the deployment
Dag author - a person that writes Dags and submits them to Airflow
Operations User - a person that triggers Dags and tasks and monitors their execution
Architecture Diagrams
The diagrams below show different ways to deploy Airflow - gradually from the simple “one machine” and single person deployment, to a more complex deployment with separate components, separate user roles and finally with more isolated security perimeters.
The meaning of the different connection types in the diagrams below is as follows:
brown solid lines represent Dag bundles submission and synchronization
blue solid lines represent deploying and accessing installed packages and plugins
black dashed lines represent control flow of workers by the scheduler (via executor)
black solid lines represent accessing the UI to manage execution of the workflows
red dashed lines represent accessing the metadata database
Basic Airflow deployment
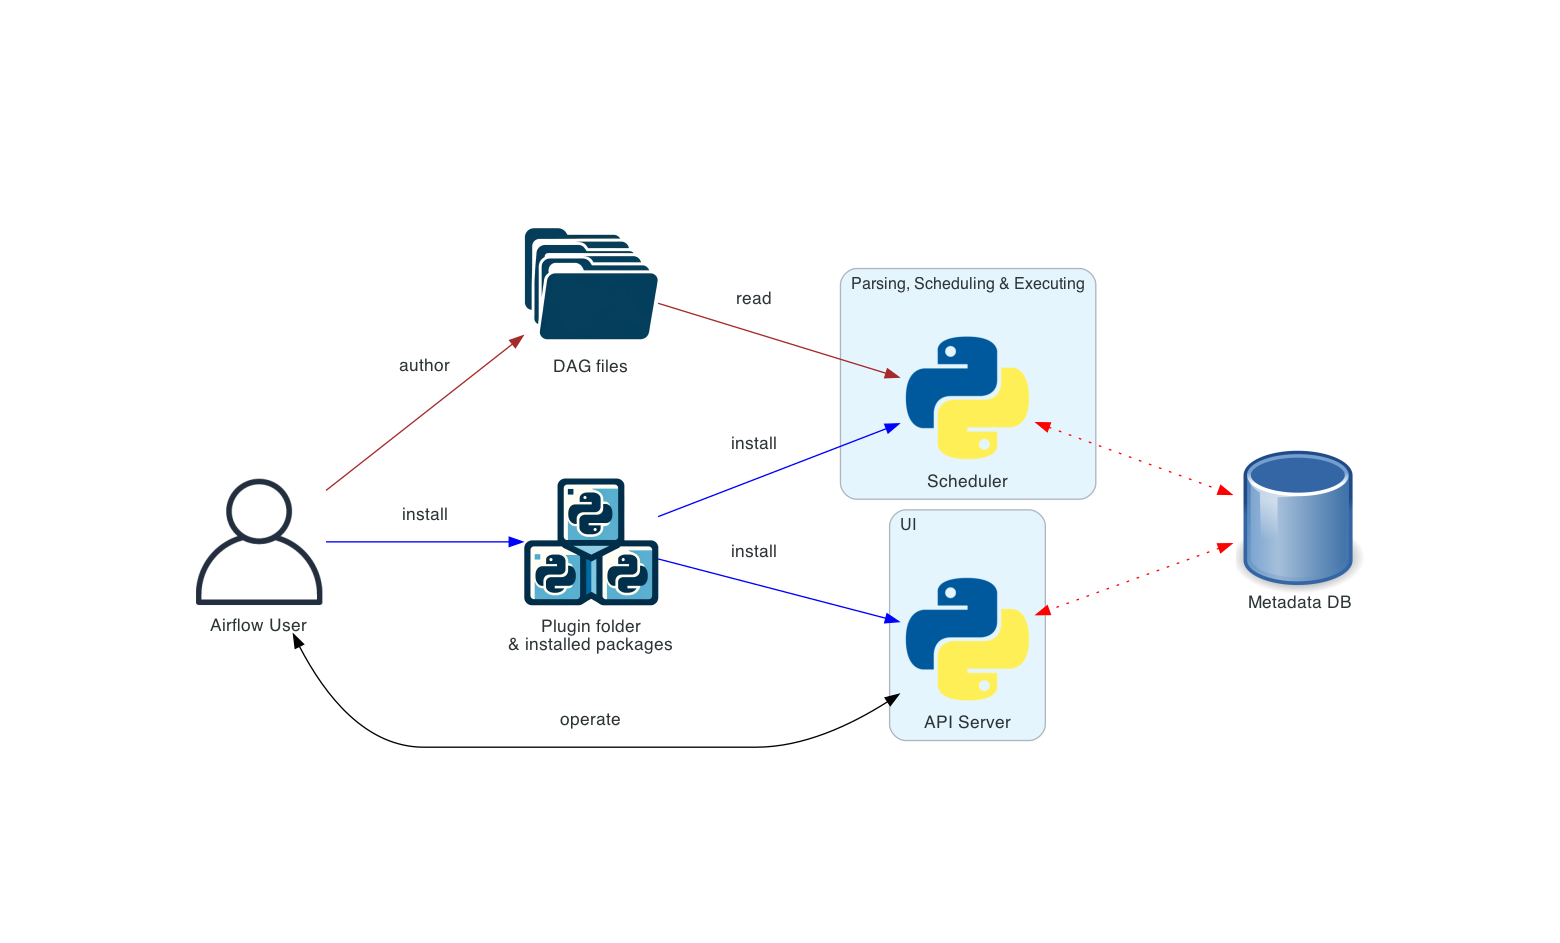
This is the simplest deployment of Airflow, usually operated and managed on a single machine. Such a deployment usually uses the LocalExecutor, where the scheduler and the workers are in the same Python process. The Dag processor runs on the same machine, reads Dag files from the Dag bundle and serializes them into the metadata database for the scheduler to read. The API server runs on the same machine as the scheduler.
Such an installation typically does not separate user roles - deployment, configuration, operation, authoring and maintenance are all done by the same person and there are no security perimeters between the components.
If you want to run Airflow on a single machine in a simple single-machine setup, you can skip the more complex diagrams below and go straight to the Workloads section.
Distributed Airflow architecture
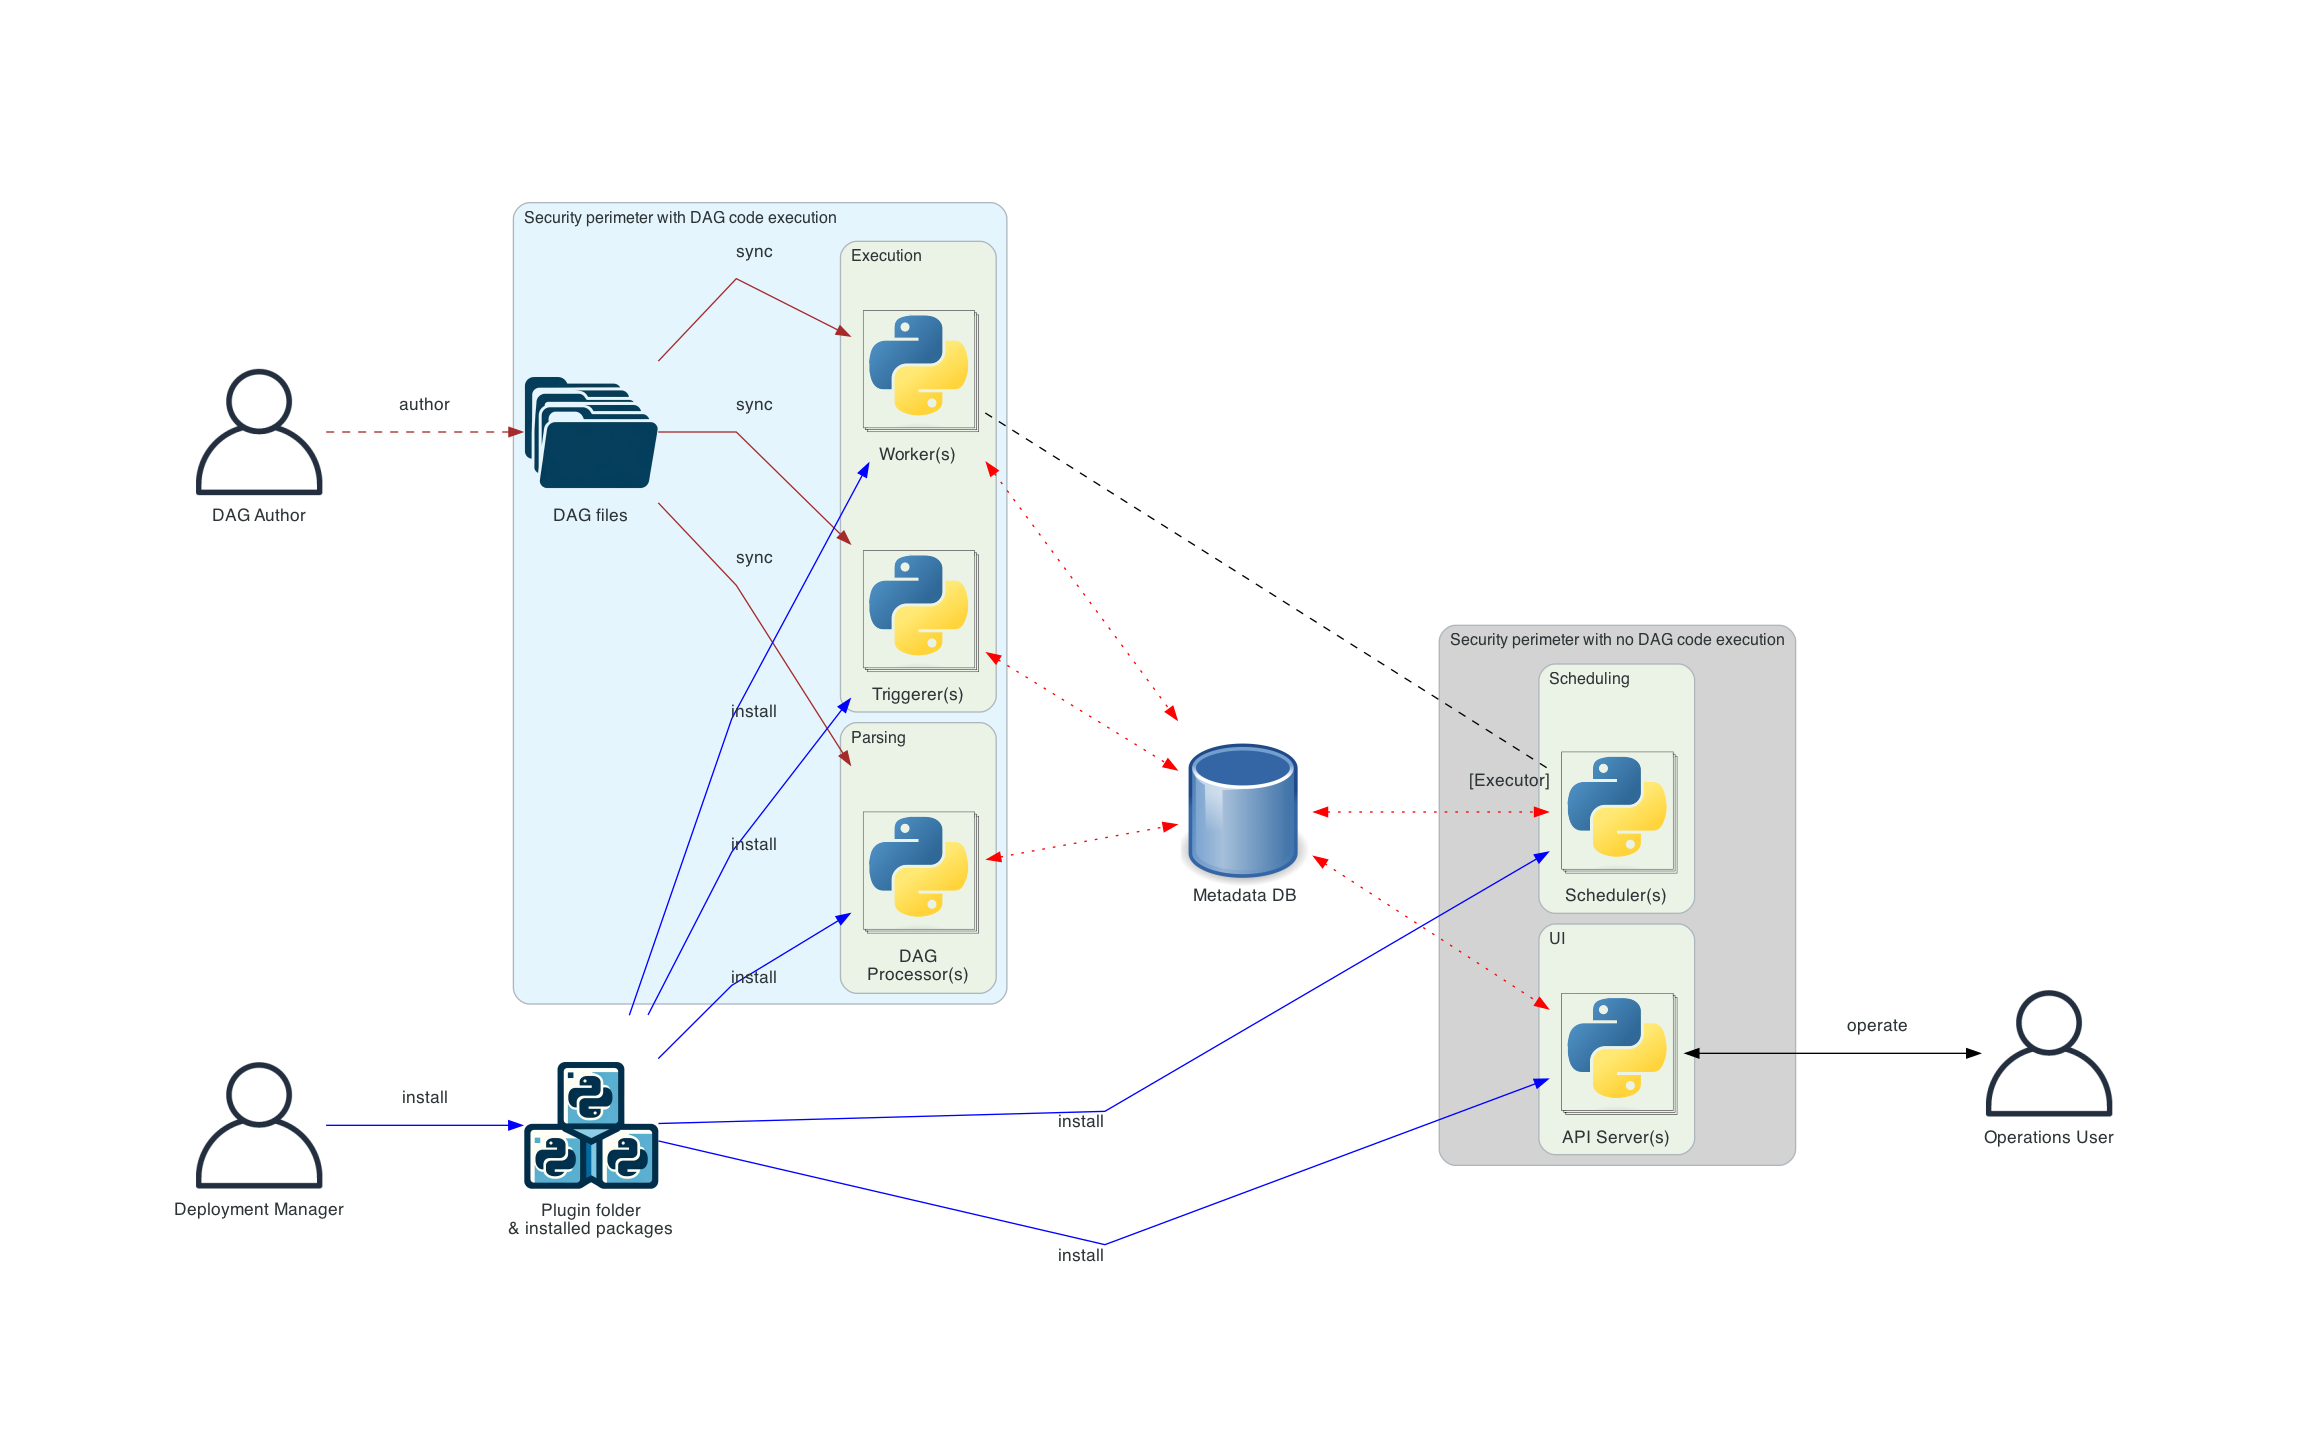
This is the architecture of Airflow where components of Airflow are distributed among multiple machines and where various roles of users are introduced - Deployment Manager, Dag author, Operations User. You can read more about those various roles in the Airflow Security Model.
In the case of a distributed deployment, it is important to consider the security aspects of the components.
The API server does not have access to the Dag bundles directly. The code in the Code tab of the
UI is read from the metadata database. The API server cannot execute any code submitted by the
Dag author. It can only execute code that is installed as an installed package or plugin by
the Deployment Manager. The Operations User only has access to the UI and can only trigger
Dags and tasks, but cannot author Dags.
The Dag processor, and workers all need access to the Dag bundles. The scheduler and triggerer read from the metadata database and do not require direct access to Dag bundles. In a distributed deployment, the workers get a specific Dag bundle version defined by the scheduler when executing a task. Typical ways to configure DAG bundle backends are described in Dag Bundles. Helm chart is one of the ways how to deploy Airflow in K8S cluster. .. image:: ../img/diagram_distributed_airflow_architecture.png
Separate Dag processing architecture
The Dag processor is a required component in all Airflow 3 deployments. It always runs as a standalone process, ensuring the scheduler never has direct access to Dag bundles and cannot execute code provided by a Dag author. While Airflow does not yet support full multi-tenant features, this separation ensures that Dag author provided code is never executed in the context of the scheduler.
Note
When using the default local disk Dag bundle backend, which does not support versioning, there can be cases where the Dag processor and workers see different versions of a Dag until both catch up to the latest files. Versioned Dag bundle backends (such as Git) address this by allowing the scheduler to pin a specific bundle version when dispatching each task. If needed, the cadence of sync and scan of the Dag bundle can be configured.
Workloads
A Dag runs through a series of Tasks, and there are three common types of task you will see:
Operators, predefined tasks that you can string together quickly to build most parts of your Dags.
Sensors, a special subclass of Operators which are entirely about waiting for an external event to happen.
A TaskFlow-decorated
@task, which is a custom Python function packaged up as a Task.
Internally, these are all actually subclasses of Airflow’s BaseOperator, and the concepts of Task and Operator are somewhat interchangeable, but it’s useful to think of them as separate concepts - essentially, Operators and Sensors are templates, and when you call one in a Dag file, you’re making a Task.
Control Flow
Dags are designed to be run many times, and multiple runs of them can happen in parallel. Dags are parameterized, always including an interval they are “running for” (the data interval), but with other optional parameters as well.
Tasks have dependencies declared on each other. You’ll see this in a Dag either using the >> and << operators:
first_task >> [second_task, third_task]
fourth_task << third_task
Or, with the set_upstream and set_downstream methods:
first_task.set_downstream([second_task, third_task])
fourth_task.set_upstream(third_task)
These dependencies are what make up the “edges” of the graph, and how Airflow works out which order to run your tasks in. By default, a task will wait for all of its upstream tasks to succeed before it runs, but this can be customized using features like Branching, LatestOnly, and Trigger Rules.
To pass data between tasks you have three options:
XComs (“Cross-communications”), a system where you can have tasks push and pull small bits of metadata.
Uploading and downloading large files from a storage service (either one you run, or part of a public cloud)
TaskFlow API automatically passes data between tasks via implicit XComs
Airflow sends out Tasks to run on Workers as space becomes available, so there’s no guarantee all the tasks in your Dag will run on the same worker or the same machine.
As you build out your Dags, they are likely to get very complex, so Airflow provides several mechanisms for making this more sustainable, example TaskGroups let you visually group tasks in the UI.
There are also features for letting you easily pre-configure access to a central resource, like a datastore, in the form of Connections & Hooks, and for limiting concurrency, via Pools.
User interface
Airflow comes with a user interface that lets you see what Dags and their tasks are doing, trigger runs of Dags, view logs, and do some limited debugging and resolution of problems with your Dags.
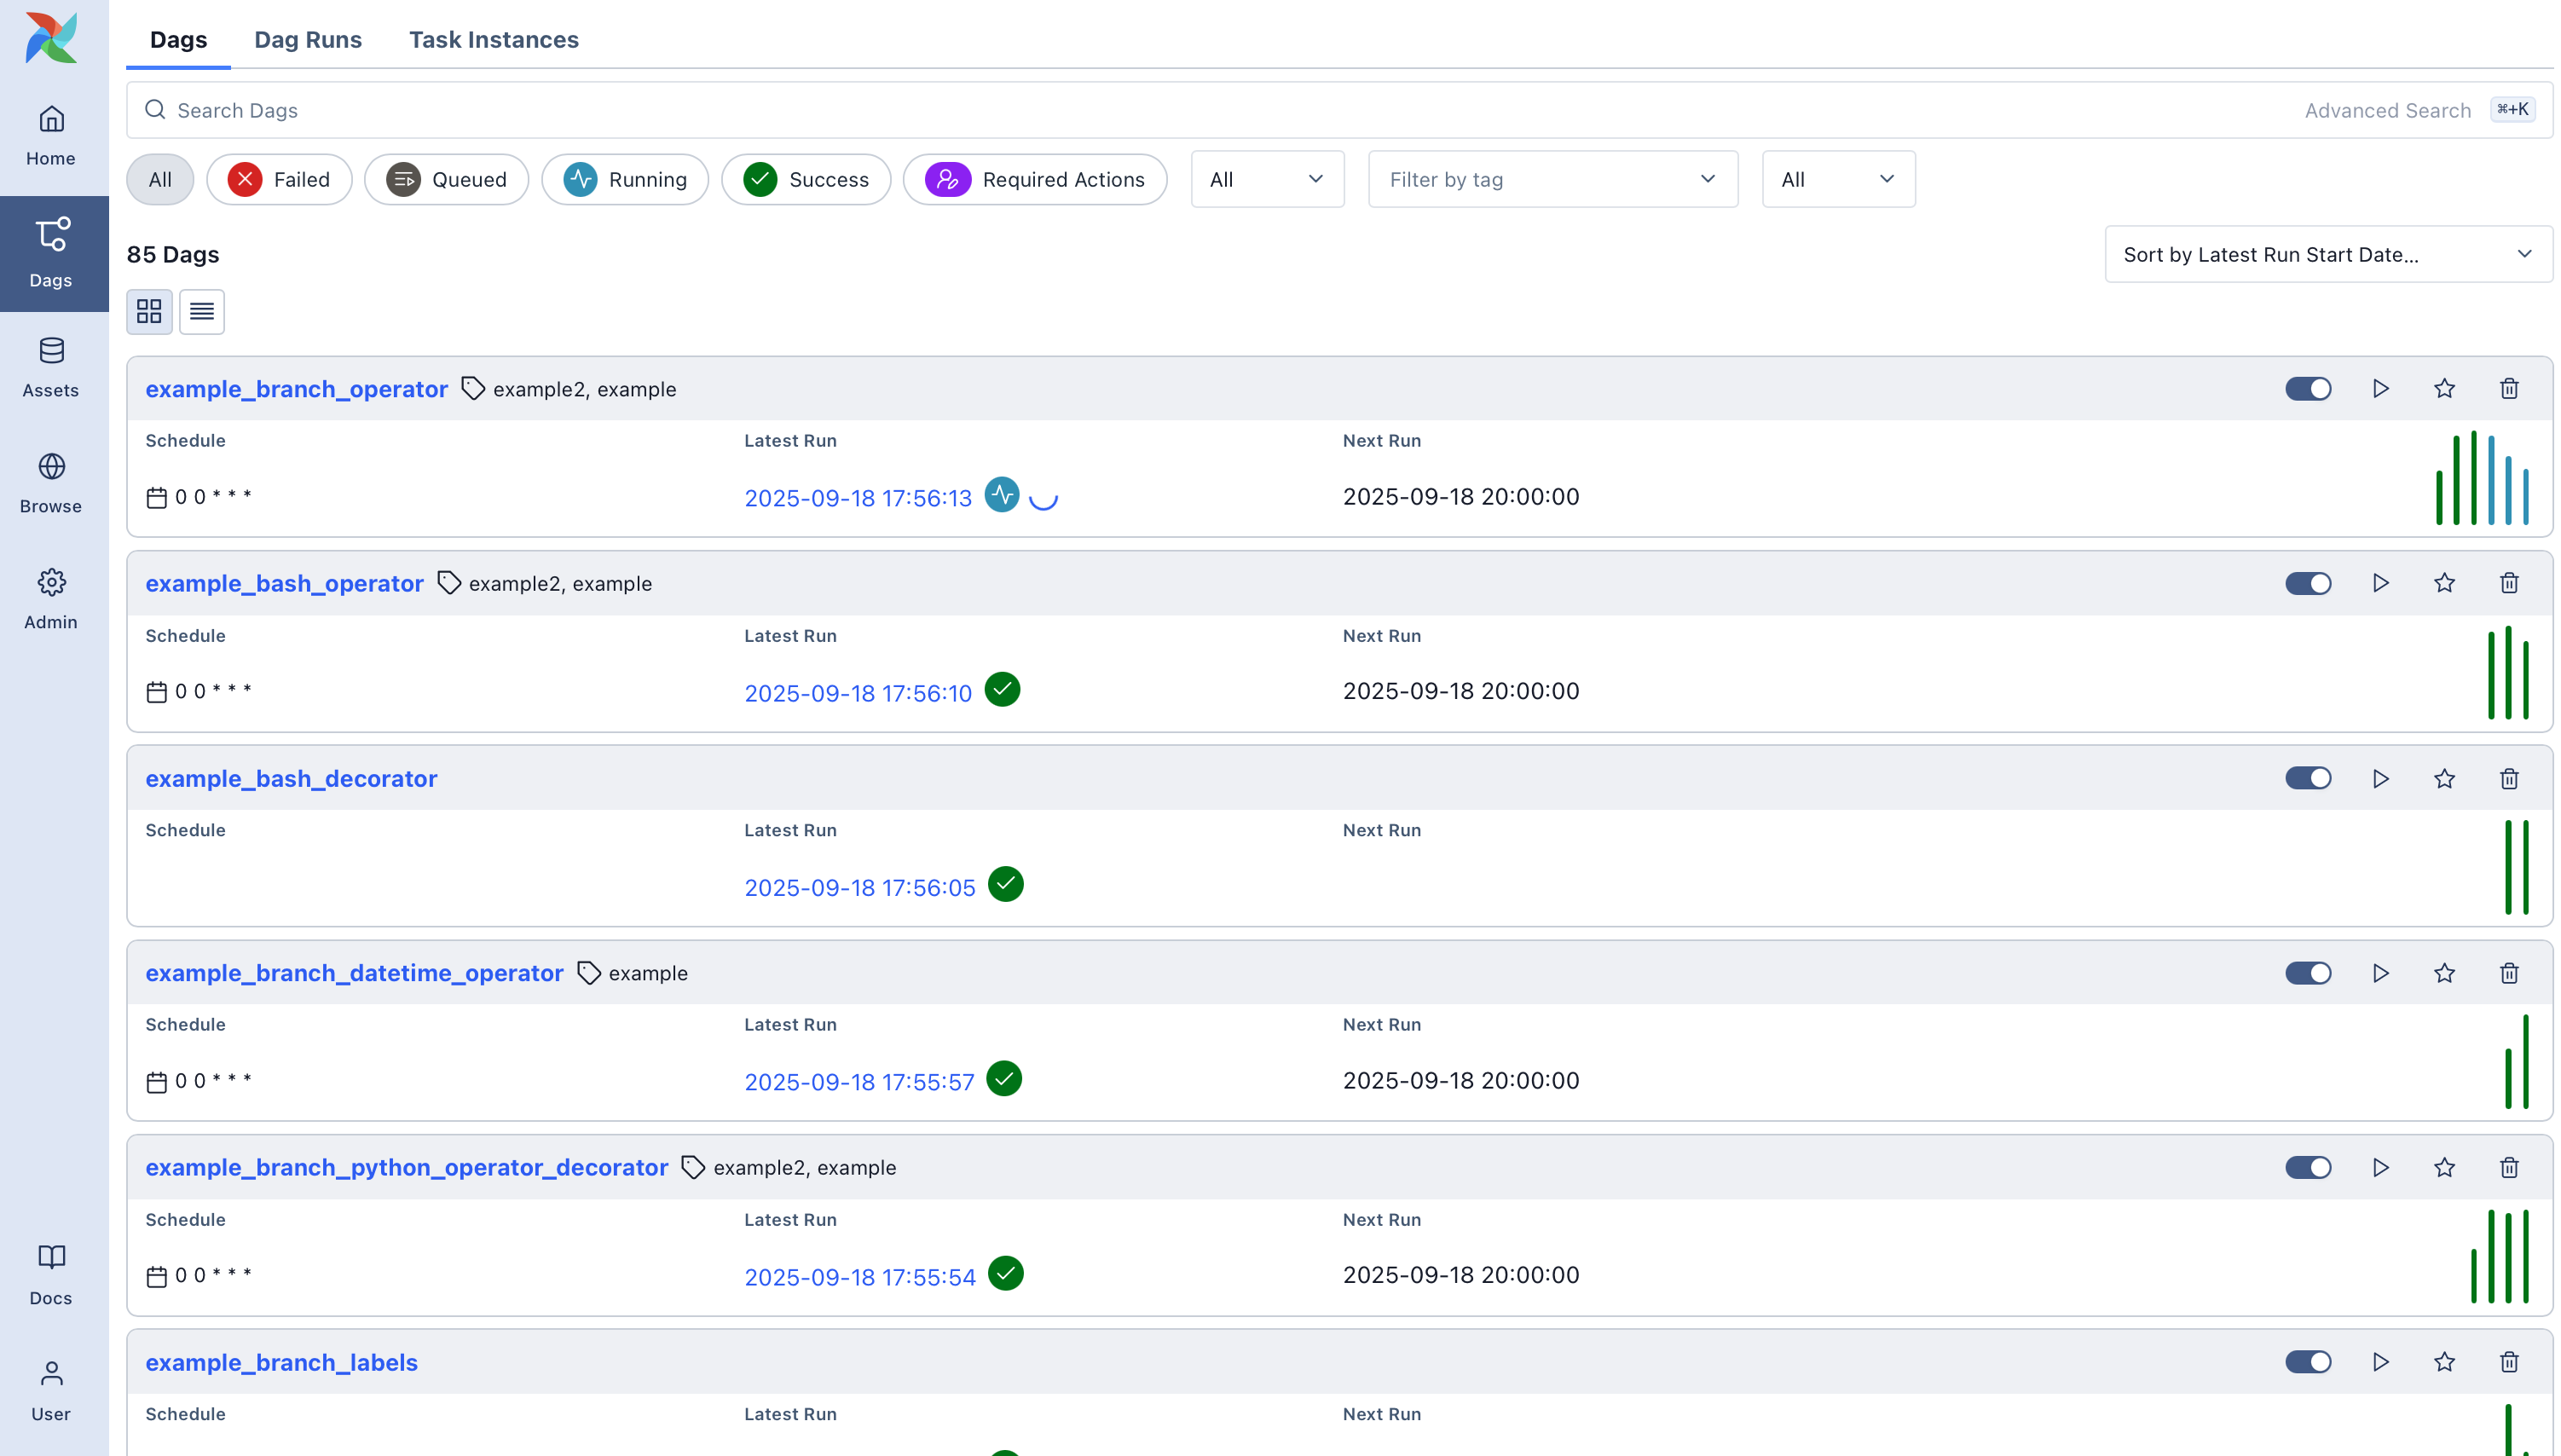
It’s generally the best way to see the status of your Airflow installation as a whole, as well as diving into individual Dags to see their layout, the status of each task, and the logs from each task.