Using the Command Line Interface
This document is meant to give an overview of all common tasks while using the CLI.
Note
For more information on CLI commands, see Command Line Interface and Environment Variables Reference
Set Up Bash/Zsh Completion
When using bash (or zsh) as your shell, airflow can use
argcomplete for auto-completion.
For global activation of all argcomplete enabled python applications run:
sudo activate-global-python-argcomplete
For permanent (but not global) airflow activation, use:
register-python-argcomplete airflow >> ~/.bashrc
For one-time activation of argcomplete for airflow only, use:
eval "$(register-python-argcomplete airflow)"
If you’re using zsh, add the following to your .zshrc:
autoload bashcompinit
bashcompinit
eval "$(register-python-argcomplete airflow)"
Creating a Connection
For information on creating connections using the CLI, see Creating a Connection from the CLI
Exporting DAG structure as an image
Airflow lets you print or save your DAG structure as an image. This is useful for documenting or sharing your DAG structure. You’ll need to have Graphviz installed.
For example, to print the example_complex DAG to the terminal:
airflow dags show example_complex
This will print the rendered DAG structure (similar to Graph) to the screen in DOT format.
Multiple file formats are supported. To use them, add the argument --save [filename].[format].
To save the example_complex DAG as a PNG file:
airflow dags show example_complex --save example_complex.png
This will save the following image as a file:
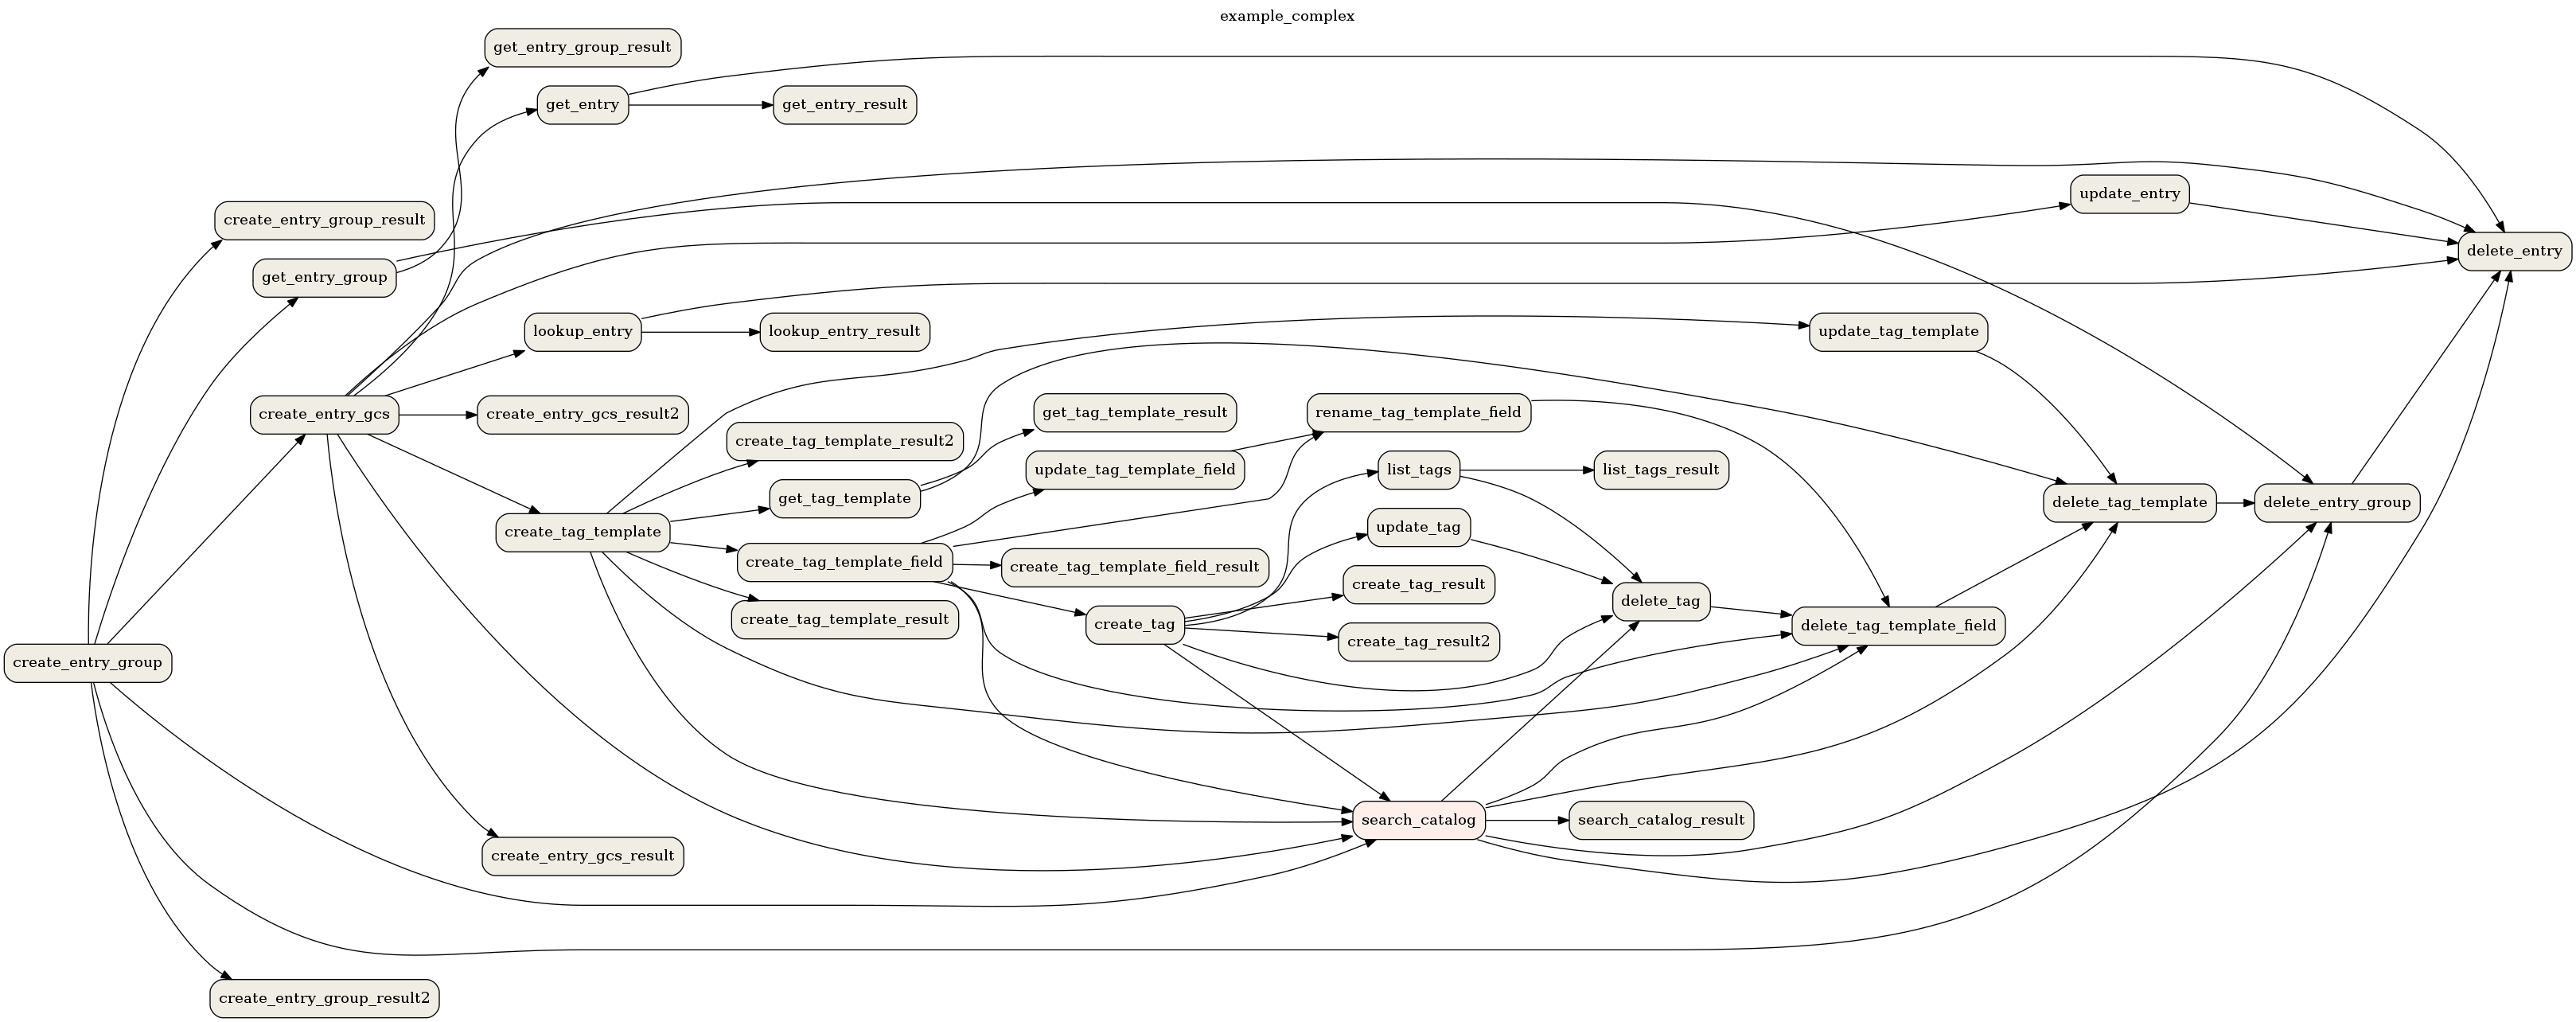
Example DAG representation
The following file formats are supported:
bmp
canon,dot,gv,xdot,xdot1.2,xdot1.4
cgimage
cmap
eps
exr
fig
gd,gd2
gif
gtk
ico
imap,cmapx
imap_np,cmapx_np
ismap
jp2
jpg,jpeg,jpe
json,json0,dot_json,xdot_json
pct,pict
pic
plain,plain-ext
png
pov
ps
ps2
psd
sgi
svg,svgz
tga
tif,tiff
tk
vml,vmlz
vrml
wbmp
webp
xlib
x11
By default, Airflow looks for DAGs in the directory specified by the dags_folder option in the
[core] section of the airflow.cfg file. You can select a new directory with the --subdir argument.
Display DAGs structure
Sometimes you will work on DAGs that contain complex dependencies. It is helpful then to preview the DAG to see if it is correct.
If you have macOS, you can use iTerm2 together with the imgcat script to display the DAG structure in the console. You also need to have Graphviz installed.
Other terminals do not support the display of high-quality graphics. You can convert the image to a text form, but its resolution will prevent you from reading it.
To do this, you should use the --imgcat switch in the airflow dags show command. For example, if you
want to display example_bash_operator DAG then you can use the following command:
airflow dags show example_bash_operator --imgcat
You will see a similar result as in the screenshot below.
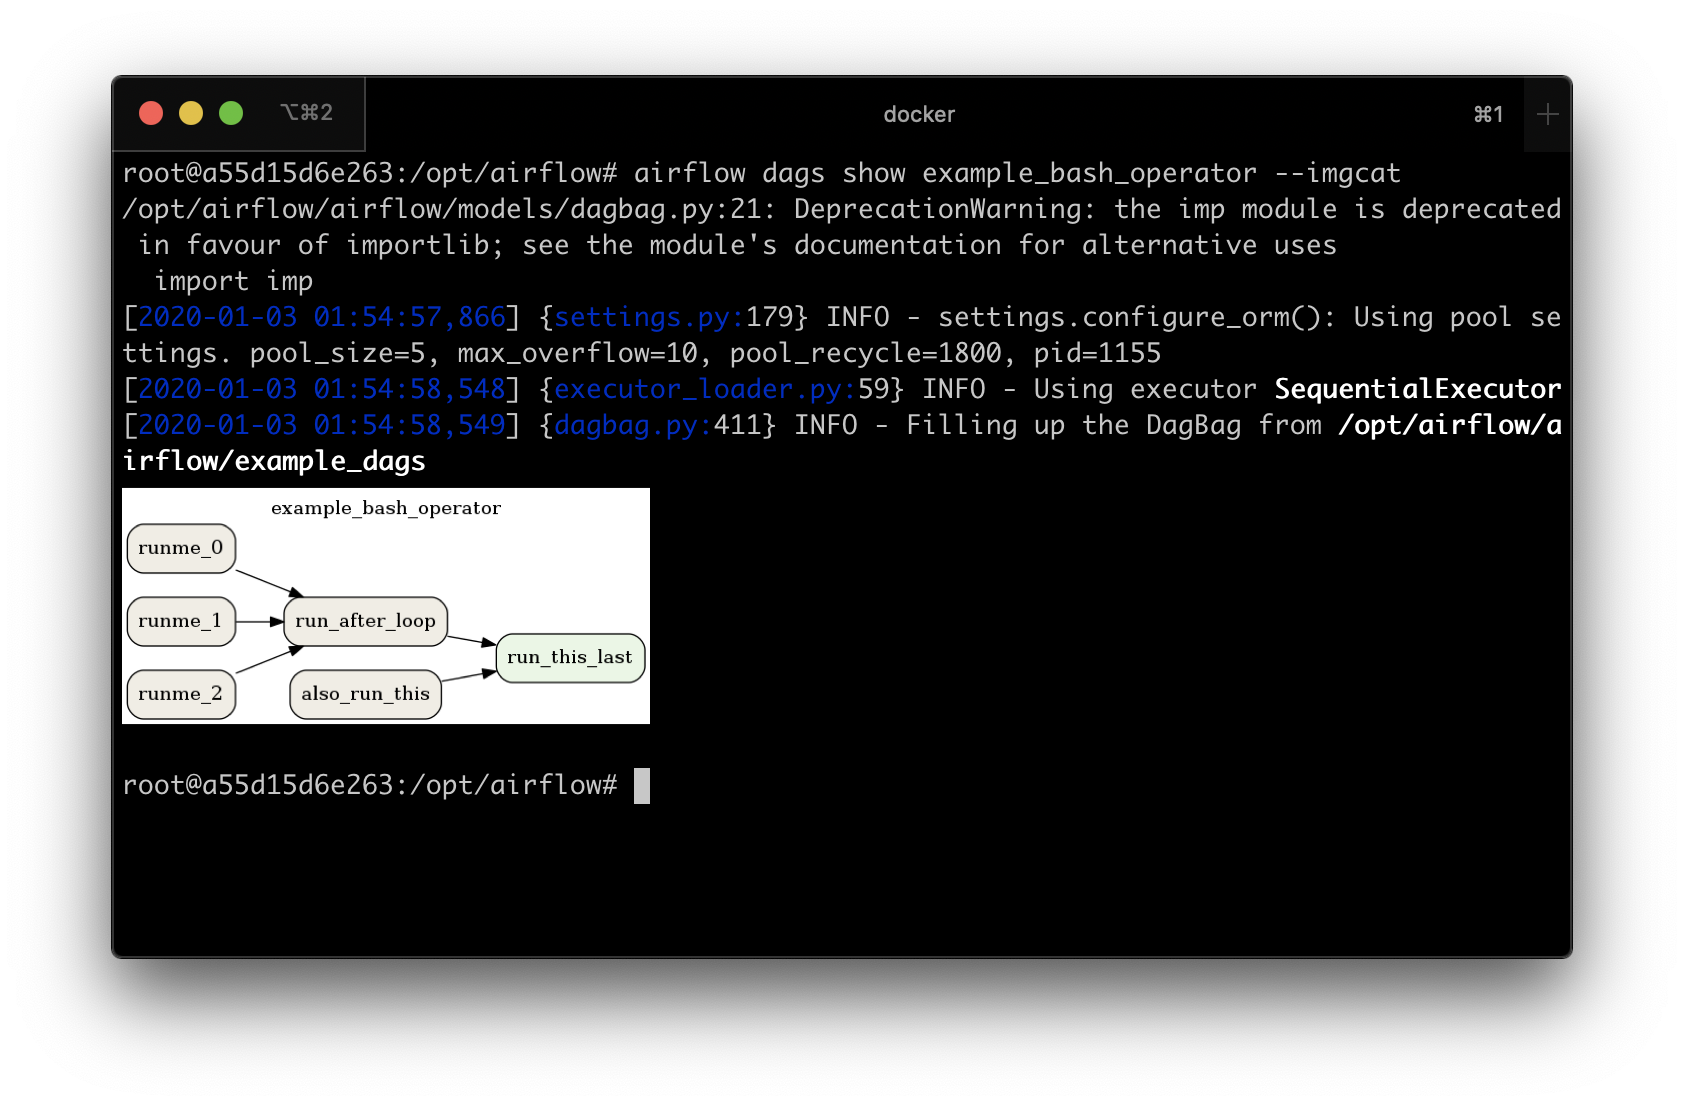
Preview of DAG in iTerm2
Formatting commands output
Some Airflow commands like airflow dags list or airflow tasks states-for-dag-run support --output flag
which allow users to change the formatting of command’s output. Possible options:
table- renders the information as a plain text table
simple- renders the information as simple table which can be parsed by standard linux utilities
json- renders the information in form of json string
yaml- render the information in form of valid yaml
Both json and yaml formats make it easier to manipulate the data using command line tools like
jq or yq. For example:
airflow tasks states-for-dag-run example_complex 2020-11-13T00:00:00+00:00 --output json | jq ".[] | {sd: .start_date, ed: .end_date}"
{
  "sd": "2020-11-29T14:53:46.811030+00:00",
  "ed": "2020-11-29T14:53:46.974545+00:00"
}
{
  "sd": "2020-11-29T14:53:56.926441+00:00",
  "ed": "2020-11-29T14:53:57.118781+00:00"
}
{
  "sd": "2020-11-29T14:53:56.915802+00:00",
  "ed": "2020-11-29T14:53:57.125230+00:00"
}
{
  "sd": "2020-11-29T14:53:56.922131+00:00",
  "ed": "2020-11-29T14:53:57.129091+00:00"
}
{
  "sd": "2020-11-29T14:53:56.931243+00:00",
  "ed": "2020-11-29T14:53:57.126306+00:00"
}
Purge history from metadata database
Note
It’s strongly recommended that you backup the metadata database before running the db clean command.
The db clean command works by deleting from each table the records older than the provided --clean-before-timestamp.
You can optionally provide a list of tables to perform deletes on. If no list of tables is supplied, all tables will be included.
You can use the --dry-run option to print the row counts in the primary tables to be cleaned.
Beware cascading deletes
Keep in mind that some tables have foreign key relationships defined with ON DELETE CASCADE so deletes in one table may trigger deletes in others. For example, the task_instance table keys to the dag_run table, so if a DagRun record is deleted, all of its associated task instances will also be deleted.
Special handling for DAG runs
Commonly, Airflow determines which DagRun to run next by looking up the latest DagRun. If you delete all DAG runs, Airflow may schedule an old DAG run that was already completed, e.g. if you have set catchup=True. So the db clean command will preserve the latest non-manually-triggered DAG run to preserve continuity in scheduling.
Considerations for backfillable DAGs
Not all DAGs are designed for use with Airflow’s backfill command. But for those which are, special care is warranted. If you delete DAG runs, and if you run backfill over a range of dates that includes the deleted DAG runs, those runs will be recreated and run again. For this reason, if you have DAGs that fall into this category you may want to refrain from deleting DAG runs and only clean other large tables such as task instance and log etc.
Upgrading Airflow
Run airflow db upgrade --help for usage details.
Running migrations manually
If desired, you can generate the sql statements for an upgrade and apply each upgrade migration manually, one at a time. To do so you may use either the --range (for Airflow version) or --revision-range (for Alembic revision) option with db upgrade. Do not skip running the Alembic revision id update commands; this is how Airflow will know where you are upgrading from the next time you need to. See Reference for Database Migrations for a mapping between revision and version.
Downgrading Airflow
Note
It’s recommended that you backup your database before running db downgrade or any other database operation.
You can downgrade to a particular Airflow version with the db downgrade command. Alternatively you may provide an Alembic revision id to downgrade to.
If you want to preview the commands but not execute them, use option --show-sql-only.
Options --from-revision and --from-version may only be used in conjunction with the --show-sql-only option, because when actually running migrations we should always downgrade from current revision.
For a mapping between Airflow version and Alembic revision see Reference for Database Migrations.
Exporting Connections
You may export connections from the database using the CLI. The supported file formats are json, yaml and env.
You may specify the target file as the parameter:
airflow connections export connections.json
Alternatively you may specify file-format parameter for overriding the file format:
airflow connections export /tmp/connections --file-format yaml
You may also specify - for STDOUT:
airflow connections export -
The JSON format contains an object where the key contains the connection ID and the value contains the definition of the connection. In this format, the connection is defined as a JSON object. The following is a sample JSON file.
{
  "airflow_db": {
    "conn_type": "mysql",
    "host": "mysql",
    "login": "root",
    "password": "plainpassword",
    "schema": "airflow",
    "port": null,
    "extra": null
  },
  "druid_broker_default": {
    "conn_type": "druid",
    "host": "druid-broker",
    "login": null,
    "password": null,
    "schema": null,
    "port": 8082,
    "extra": "{\"endpoint\": \"druid/v2/sql\"}"
  }
}
The YAML file structure is similar to that of a JSON. The key-value pair of connection ID and the definitions of one or more connections. In this format, the connection is defined as a YAML object. The following is a sample YAML file.
airflow_db:
  conn_type: mysql
  extra: null
  host: mysql
  login: root
  password: plainpassword
  port: null
  schema: airflow
druid_broker_default:
  conn_type: druid
  extra: '{"endpoint": "druid/v2/sql"}'
  host: druid-broker
  login: null
  password: null
  port: 8082
  schema: null
You may also export connections in .env format. The key is the connection ID, and the value is the serialized representation of the connection, using either Airflow’s Connection URI format or JSON. To use JSON provide option --serialization-format=json otherwise the Airflow Connection URI format will be used. The following are sample .env files using the two formats.
URI example:
airflow_db=mysql://root:plainpassword@mysql/airflow
druid_broker_default=druid://druid-broker:8082?endpoint=druid%2Fv2%2Fsql
JSON example output:
airflow_db={"conn_type": "mysql", "login": "root", "password": "plainpassword", "host": "mysql", "schema": "airflow"}
druid_broker_default={"conn_type": "druid", "host": "druid-broker", "port": 8082, "extra": "{\"endpoint\": \"druid/v2/sql\"}"}