Tutorial
This tutorial walks you through some of the fundamental Airflow concepts, objects, and their usage while writing your first pipeline.
Example Pipeline definition
Here is an example of a basic pipeline definition. Do not worry if this looks complicated, a line by line explanation follows below.
from datetime import datetime, timedelta
from textwrap import dedent

# The DAG object; we'll need this to instantiate a DAG
from airflow import DAG

# Operators; we need this to operate!
from airflow.operators.bash import BashOperator
with DAG(
'tutorial',
# These args will get passed on to each operator
# You can override them on a per-task basis during operator initialization
default_args={
    'depends_on_past': False,
    'email': ['airflow@example.com'],
    'email_on_failure': False,
    'email_on_retry': False,
    'retries': 1,
    'retry_delay': timedelta(minutes=5),
    # 'queue': 'bash_queue',
    # 'pool': 'backfill',
    # 'priority_weight': 10,
    # 'end_date': datetime(2016, 1, 1),
    # 'wait_for_downstream': False,
    # 'sla': timedelta(hours=2),
    # 'execution_timeout': timedelta(seconds=300),
    # 'on_failure_callback': some_function,
    # 'on_success_callback': some_other_function,
    # 'on_retry_callback': another_function,
    # 'sla_miss_callback': yet_another_function,
    # 'trigger_rule': 'all_success'
},
description='A simple tutorial DAG',
schedule_interval=timedelta(days=1),
start_date=datetime(2021, 1, 1),
catchup=False,
tags=['example'],
) as dag:
# t1, t2 and t3 are examples of tasks created by instantiating operators
t1 = BashOperator(
task_id='print_date',
bash_command='date',
)
t2 = BashOperator(
task_id='sleep',
depends_on_past=False,
bash_command='sleep 5',
retries=3,
)
t1.doc_md = dedent(
"""\
#### Task Documentation
You can document your task using the attributes `doc_md` (markdown),
`doc` (plain text), `doc_rst`, `doc_json`, `doc_yaml` which gets
rendered in the UI's Task Instance Details page.

"""
)
dag.doc_md = __doc__ # providing that you have a docstring at the beginning of the DAG
dag.doc_md = """
This is a documentation placed anywhere
""" # otherwise, type it like this
templated_command = dedent(
"""
{% for i in range(5) %}
echo "{{ ds }}"
echo "{{ macros.ds_add(ds, 7)}}"
{% endfor %}
"""
)
t3 = BashOperator(
task_id='templated',
depends_on_past=False,
bash_command=templated_command,
)
t1 >> [t2, t3]
It’s a DAG definition file
One thing to wrap your head around (it may not be very intuitive for everyone at first) is that this Airflow Python script is really just a configuration file specifying the DAG’s structure as code. The actual tasks defined here will run in a different context from the context of this script. Different tasks run on different workers at different points in time, which means that this script cannot be used to cross communicate between tasks. Note that for this purpose we have a more advanced feature called XComs.
People sometimes think of the DAG definition file as a place where they can do some actual data processing - that is not the case at all! The script’s purpose is to define a DAG object. It needs to evaluate quickly (seconds, not minutes) since the scheduler will execute it periodically to reflect the changes if any.
Importing Modules
An Airflow pipeline is just a Python script that happens to define an Airflow DAG object. Let’s start by importing the libraries we will need.
from datetime import datetime, timedelta
from textwrap import dedent
# The DAG object; we'll need this to instantiate a DAG
from airflow import DAG
# Operators; we need this to operate!
from airflow.operators.bash import BashOperator
See Modules Management for details on how Python and Airflow manage modules.
Default Arguments
We’re about to create a DAG and some tasks, and we have the choice to explicitly pass a set of arguments to each task’s constructor (which would become redundant), or (better!) we can define a dictionary of default parameters that we can use when creating tasks.
# These args will get passed on to each operator
# You can override them on a per-task basis during operator initialization
default_args={
'depends_on_past': False,
'email': ['airflow@example.com'],
'email_on_failure': False,
'email_on_retry': False,
'retries': 1,
'retry_delay': timedelta(minutes=5),
# 'queue': 'bash_queue',
# 'pool': 'backfill',
# 'priority_weight': 10,
# 'end_date': datetime(2016, 1, 1),
# 'wait_for_downstream': False,
# 'sla': timedelta(hours=2),
# 'execution_timeout': timedelta(seconds=300),
# 'on_failure_callback': some_function,
# 'on_success_callback': some_other_function,
# 'on_retry_callback': another_function,
# 'sla_miss_callback': yet_another_function,
# 'trigger_rule': 'all_success'
},
For more information about the BaseOperator’s parameters and what they do,
refer to the airflow.models.BaseOperator documentation.
Also, note that you could easily define different sets of arguments that would serve different purposes. An example of that would be to have different settings between a production and development environment.
Instantiate a DAG
We’ll need a DAG object to nest our tasks into. Here we pass a string
that defines the dag_id, which serves as a unique identifier for your DAG.
We also pass the default argument dictionary that we just defined and
define a schedule_interval of 1 day for the DAG.
with DAG(
    'tutorial',
    # These args will get passed on to each operator
    # You can override them on a per-task basis during operator initialization
    default_args={
        'depends_on_past': False,
        'email': ['airflow@example.com'],
        'email_on_failure': False,
        'email_on_retry': False,
        'retries': 1,
        'retry_delay': timedelta(minutes=5),
        # 'queue': 'bash_queue',
        # 'pool': 'backfill',
        # 'priority_weight': 10,
        # 'end_date': datetime(2016, 1, 1),
        # 'wait_for_downstream': False,
        # 'sla': timedelta(hours=2),
        # 'execution_timeout': timedelta(seconds=300),
        # 'on_failure_callback': some_function,
        # 'on_success_callback': some_other_function,
        # 'on_retry_callback': another_function,
        # 'sla_miss_callback': yet_another_function,
        # 'trigger_rule': 'all_success'
    },
    description='A simple tutorial DAG',
    schedule_interval=timedelta(days=1),
    start_date=datetime(2021, 1, 1),
    catchup=False,
    tags=['example'],
) as dag:
Tasks
Tasks are generated when instantiating operator objects. An object
instantiated from an operator is called a task. The first argument
task_id acts as a unique identifier for the task.
t1 = BashOperator(
    task_id='print_date',
    bash_command='date',
)

t2 = BashOperator(
    task_id='sleep',
    depends_on_past=False,
    bash_command='sleep 5',
    retries=3,
)
Notice how we pass a mix of operator specific arguments (bash_command) and
an argument common to all operators (retries) inherited
from BaseOperator to the operator’s constructor. This is simpler than
passing every argument for every constructor call. Also, notice that in
the second task we override the retries parameter with 3.
The precedence rules for a task are as follows:
Explicitly passed arguments
Values that exist in the
default_argsdictionaryThe operator’s default value, if one exists
A task must include or inherit the arguments task_id and owner,
otherwise Airflow will raise an exception.
Templating with Jinja
Airflow leverages the power of Jinja Templating and provides the pipeline author with a set of built-in parameters and macros. Airflow also provides hooks for the pipeline author to define their own parameters, macros and templates.
This tutorial barely scratches the surface of what you can do with
templating in Airflow, but the goal of this section is to let you know
this feature exists, get you familiar with double curly brackets, and
point to the most common template variable: {{ ds }} (today’s “date
stamp”).
templated_command = dedent(
    """
{% for i in range(5) %}
    echo "{{ ds }}"
    echo "{{ macros.ds_add(ds, 7)}}"
{% endfor %}
"""
)

t3 = BashOperator(
    task_id='templated',
    depends_on_past=False,
    bash_command=templated_command,
)
Notice that the templated_command contains code logic in {% %} blocks,
references parameters like {{ ds }}, and calls a function as in
{{ macros.ds_add(ds, 7)}}.
Files can also be passed to the bash_command argument, like
bash_command='templated_command.sh', where the file location is relative to
the directory containing the pipeline file (tutorial.py in this case). This
may be desirable for many reasons, like separating your script’s logic and
pipeline code, allowing for proper code highlighting in files composed in
different languages, and general flexibility in structuring pipelines. It is
also possible to define your template_searchpath as pointing to any folder
locations in the DAG constructor call.
Using that same DAG constructor call, it is possible to define
user_defined_macros which allow you to specify your own variables.
For example, passing dict(foo='bar') to this argument allows you
to use {{ foo }} in your templates. Moreover, specifying
user_defined_filters allows you to register your own filters. For example,
passing dict(hello=lambda name: 'Hello %s' % name) to this argument allows
you to use {{ 'world' | hello }} in your templates. For more information
regarding custom filters have a look at the
Jinja Documentation.
For more information on the variables and macros that can be referenced in templates, make sure to read through the Templates reference.
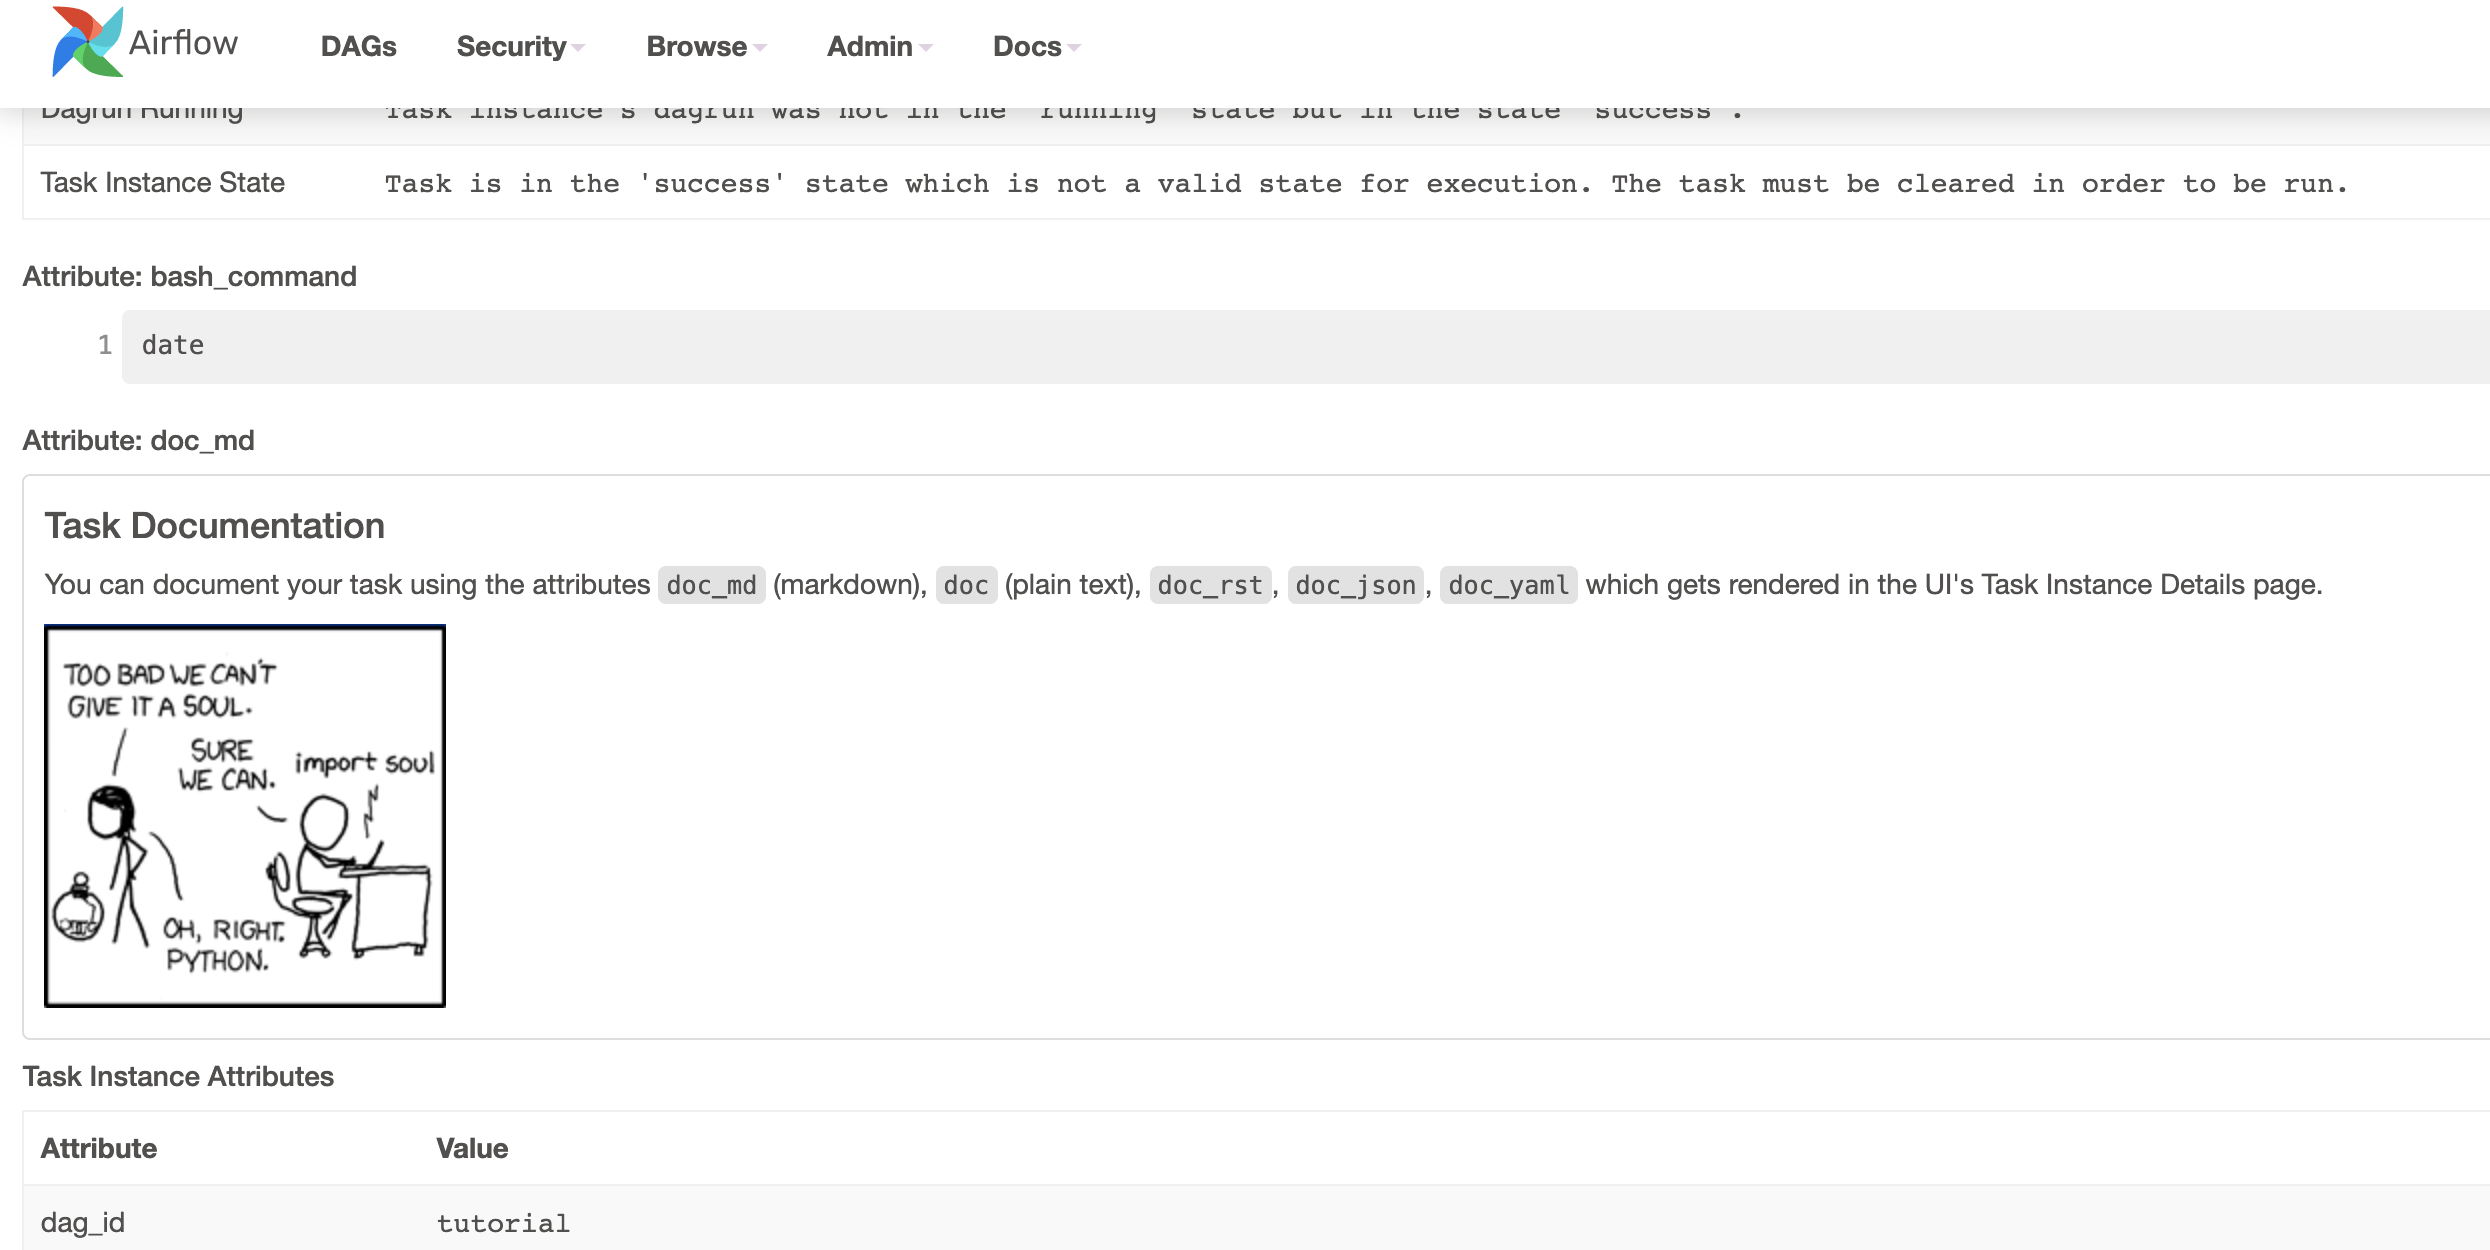
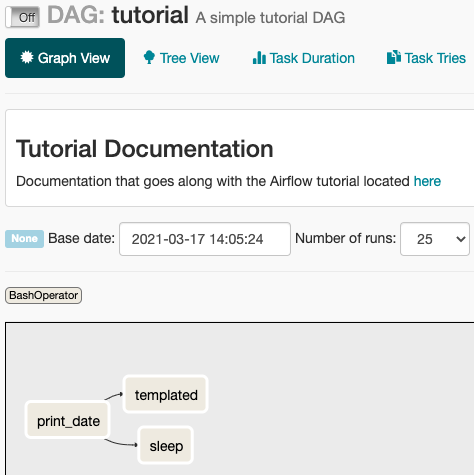
Adding DAG and Tasks documentation
We can add documentation for DAG or each single task. DAG documentation only supports markdown so far, while task documentation supports plain text, markdown, reStructuredText, json, and yaml. The DAG documentation can be written as a doc string at the beginning of the DAG file (recommended), or anywhere else in the file. Below you can find some examples on how to implement task and DAG docs, as well as screenshots:
t1.doc_md = dedent(
"""\
#### Task Documentation
You can document your task using the attributes `doc_md` (markdown),
`doc` (plain text), `doc_rst`, `doc_json`, `doc_yaml` which gets
rendered in the UI's Task Instance Details page.

"""
)
dag.doc_md = __doc__ # providing that you have a docstring at the beginning of the DAG
dag.doc_md = """
This is a documentation placed anywhere
""" # otherwise, type it like this
Setting up Dependencies
We have tasks t1, t2 and t3 that do not depend on each other. Here’s a few ways
you can define dependencies between them:
t1.set_downstream(t2)

# This means that t2 will depend on t1
# running successfully to run.
# It is equivalent to:
t2.set_upstream(t1)

# The bit shift operator can also be
# used to chain operations:
t1 >> t2

# And the upstream dependency with the
# bit shift operator:
t2 << t1

# Chaining multiple dependencies becomes
# concise with the bit shift operator:
t1 >> t2 >> t3

# A list of tasks can also be set as
# dependencies. These operations
# all have the same effect:
t1.set_downstream([t2, t3])
t1 >> [t2, t3]
[t2, t3] << t1
Note that when executing your script, Airflow will raise exceptions when it finds cycles in your DAG or when a dependency is referenced more than once.
Using time zones
Creating a time zone aware DAG is quite simple. Just make sure to supply a time zone aware dates
using pendulum. Don’t try to use standard library
timezone as they are known to
have limitations and we deliberately disallow using them in DAGs.
Recap
Alright, so we have a pretty basic DAG. At this point your code should look something like this:
from datetime import datetime, timedelta
from textwrap import dedent
# The DAG object; we'll need this to instantiate a DAG
from airflow import DAG
# Operators; we need this to operate!
from airflow.operators.bash import BashOperator
with DAG(
'tutorial',
# These args will get passed on to each operator
# You can override them on a per-task basis during operator initialization
default_args={
'depends_on_past': False,
'email': ['airflow@example.com'],
'email_on_failure': False,
'email_on_retry': False,
'retries': 1,
'retry_delay': timedelta(minutes=5),
# 'queue': 'bash_queue',
# 'pool': 'backfill',
# 'priority_weight': 10,
# 'end_date': datetime(2016, 1, 1),
# 'wait_for_downstream': False,
# 'sla': timedelta(hours=2),
# 'execution_timeout': timedelta(seconds=300),
# 'on_failure_callback': some_function,
# 'on_success_callback': some_other_function,
# 'on_retry_callback': another_function,
# 'sla_miss_callback': yet_another_function,
# 'trigger_rule': 'all_success'
},
description='A simple tutorial DAG',
schedule_interval=timedelta(days=1),
start_date=datetime(2021, 1, 1),
catchup=False,
tags=['example'],
) as dag:
# t1, t2 and t3 are examples of tasks created by instantiating operators
t1 = BashOperator(
task_id='print_date',
bash_command='date',
)
t2 = BashOperator(
task_id='sleep',
depends_on_past=False,
bash_command='sleep 5',
retries=3,
)
t1.doc_md = dedent(
"""\
#### Task Documentation
You can document your task using the attributes `doc_md` (markdown),
`doc` (plain text), `doc_rst`, `doc_json`, `doc_yaml` which gets
rendered in the UI's Task Instance Details page.

"""
)
dag.doc_md = __doc__ # providing that you have a docstring at the beginning of the DAG
dag.doc_md = """
This is a documentation placed anywhere
""" # otherwise, type it like this
templated_command = dedent(
"""
{% for i in range(5) %}
echo "{{ ds }}"
echo "{{ macros.ds_add(ds, 7)}}"
{% endfor %}
"""
)
t3 = BashOperator(
task_id='templated',
depends_on_past=False,
bash_command=templated_command,
)
t1 >> [t2, t3]
Testing
Running the Script
Time to run some tests. First, let’s make sure the pipeline is parsed successfully.
Let’s assume we are saving the code from the previous step in
tutorial.py in the DAGs folder referenced in your airflow.cfg.
The default location for your DAGs is ~/airflow/dags.
python ~/airflow/dags/tutorial.py
If the script does not raise an exception it means that you have not done anything horribly wrong, and that your Airflow environment is somewhat sound.
Command Line Metadata Validation
Let’s run a few commands to validate this script further.
# initialize the database tables
airflow db init

# print the list of active DAGs
airflow dags list

# prints the list of tasks in the "tutorial" DAG
airflow tasks list tutorial

# prints the hierarchy of tasks in the "tutorial" DAG
airflow tasks list tutorial --tree
Testing
Let’s test by running the actual task instances for a specific date. The date specified in this context is called the logical date (also called execution date for historical reasons), which simulates the scheduler running your task or DAG for a specific date and time, even though it physically will run now (or as soon as its dependencies are met).
We said the scheduler runs your task for a specific date and time, not at. This is because each run of a DAG conceptually represents not a specific date and time, but an interval between two times, called a data interval. A DAG run’s logical date is the start of its data interval.
# command layout: command subcommand dag_id task_id date

# testing print_date
airflow tasks test tutorial print_date 2015-06-01

# testing sleep
airflow tasks test tutorial sleep 2015-06-01
Now remember what we did with templating earlier? See how this template gets rendered and executed by running this command:
# testing templated
airflow tasks test tutorial templated 2015-06-01
This should result in displaying a verbose log of events and ultimately running your bash command and printing the result.
Note that the airflow tasks test command runs task instances locally, outputs
their log to stdout (on screen), does not bother with dependencies, and
does not communicate state (running, success, failed, …) to the database.
It simply allows testing a single task instance.
The same applies to airflow dags test [dag_id] [logical_date], but on a DAG
level. It performs a single DAG run of the given DAG id. While it does take task
dependencies into account, no state is registered in the database. It is
convenient for locally testing a full run of your DAG, given that e.g. if one of
your tasks expects data at some location, it is available.
Backfill
Everything looks like it’s running fine so let’s run a backfill.
backfill will respect your dependencies, emit logs into files and talk to
the database to record status. If you do have a webserver up, you will be able
to track the progress. airflow webserver will start a web server if you
are interested in tracking the progress visually as your backfill progresses.
Note that if you use depends_on_past=True, individual task instances
will depend on the success of their previous task instance (that is, previous
according to the logical date). Task instances with their logical dates equal to
start_date will disregard this dependency because there would be no past
task instances created for them.
You may also want to consider wait_for_downstream=True when using depends_on_past=True.
While depends_on_past=True causes a task instance to depend on the success
of its previous task_instance, wait_for_downstream=True will cause a task instance
to also wait for all task instances immediately downstream of the previous
task instance to succeed.
The date range in this context is a start_date and optionally an end_date,
which are used to populate the run schedule with task instances from this dag.
# optional, start a web server in debug mode in the background
# airflow webserver --debug &

# start your backfill on a date range
airflow dags backfill tutorial \
    --start-date 2015-06-01 \
    --end-date 2015-06-07
Pipeline Example
Lets look at another example; we need to get some data from a file which is hosted online and need to insert into our local database. We also need to look at removing duplicate rows while inserting.
Initial setup
We need to have Docker installed as we will be using the quick-start docker-compose installation for this example. The steps below should be sufficient, but see the quick-start documentation for full instructions.
# Download the docker-compose.yaml file
curl -Lf0 'https://airflow.apache.org/docs/apache-airflow/stable/docker-compose.yaml'

# Make expected directories and set an expected environment variable
mkdir -p ./dags ./logs ./plugins
echo -e "AIRFLOW_UID=$(id -u)" > .env

# Initialize the database
docker-compose up airflow-init

# Start up all services
docker-compose up
After all services have started up, the web UI will be available at: http://localhost:8080. The default account has the username airflow and the password airflow.
We will also need to create a connection to the postgres db. To create one via the web UI, from the “Admin” menu, select “Connections”, then click the Plus sign to “Add a new record” to the list of connections.
Fill in the fields as shown below. Note the Connection Id value, which we’ll pass as a parameter for the postgres_conn_id kwarg.
Connection Id: tutorial_pg_conn
Connection Type: postgres
Host: postgres
Schema: airflow
Login: airflow
Password: airflow
Port: 5432
Test your connection and if the test is successful, save your connection.
Table Creation Tasks
We can use the PostgresOperator to define tasks that create tables in our postgres db.
We’ll create one table to facilitate data cleaning steps (employees_temp) and another table to store our cleaned data (employees).
from airflow.providers.postgres.operators.postgres import PostgresOperator

create_employees_table = PostgresOperator(
    task_id="create_employees_table",
    postgres_conn_id="tutorial_pg_conn",
    sql="""
        CREATE TABLE IF NOT EXISTS employees (
            "Serial Number" NUMERIC PRIMARY KEY,
            "Company Name" TEXT,
            "Employee Markme" TEXT,
            "Description" TEXT,
            "Leave" INTEGER
        );""",
)

create_employees_temp_table = PostgresOperator(
    task_id="create_employees_temp_table",
    postgres_conn_id="tutorial_pg_conn",
    sql="""
        DROP TABLE IF EXISTS employees_temp;
        CREATE TABLE employees_temp (
            "Serial Number" NUMERIC PRIMARY KEY,
            "Company Name" TEXT,
            "Employee Markme" TEXT,
            "Description" TEXT,
            "Leave" INTEGER
        );""",
)
Optional Note:
If you want to abstract these sql statements out of your DAG, you can move the statements sql files somewhere within the dags/ directory and pass the sql file_path (relative to dags/) to the sql kwarg. For employees for example, create a sql directory in dags/, put employees DDL in dags/sql/employees_schema.sql, and modify the PostgresOperator() to:
create_employees_table = PostgresOperator(
    task_id="create_employees_table",
    postgres_conn_id="tutorial_pg_conn",
    sql="sql/employees_schema.sql",
)
and repeat for the employees_temp table.
Data Retrieval Task
Here we retrieve data, save it to a file on our Airflow instance, and load the data from that file into an intermediate table where we can execute data cleaning steps.
import os
import requests
from airflow.decorators import task
from airflow.providers.postgres.hooks.postgres import PostgresHook


@task
def get_data():
    # NOTE: configure this as appropriate for your airflow environment
    data_path = "/opt/airflow/dags/files/employees.csv"
    os.makedirs(os.path.dirname(data_path), exist_ok=True)

    url = "https://raw.githubusercontent.com/apache/airflow/main/docs/apache-airflow/pipeline_example.csv"

    response = requests.request("GET", url)

    with open(data_path, "w") as file:
        file.write(response.text)

    postgres_hook = PostgresHook(postgres_conn_id="tutorial_pg_conn")
    conn = postgres_hook.get_conn()
    cur = conn.cursor()
    with open(data_path, "r") as file:
        cur.copy_expert(
            "COPY employees_temp FROM STDIN WITH CSV HEADER DELIMITER AS ',' QUOTE '\"'",
            file,
        )
    conn.commit()
Data Merge Task
Here we select completely unique records from the retrieved data, then we check to see if any employee Serial Numbers are already in the database (if they are, we update those records with the new data).
from airflow.decorators import task
from airflow.providers.postgres.hooks.postgres import PostgresHook


@task
def merge_data():
    query = """
        INSERT INTO employees
        SELECT *
        FROM (
            SELECT DISTINCT *
            FROM employees_temp
        )
        ON CONFLICT ("Serial Number") DO UPDATE
        SET "Serial Number" = excluded."Serial Number";
    """
    try:
        postgres_hook = PostgresHook(postgres_conn_id="tutorial_pg_conn")
        conn = postgres_hook.get_conn()
        cur = conn.cursor()
        cur.execute(query)
        conn.commit()
        return 0
    except Exception as e:
        return 1
Completing our DAG:
We’ve developed our tasks, now we need to wrap them in a DAG, which enables us to define when and how tasks should run, and state any dependencies that tasks have on other tasks. The DAG below is configured to:
run every day a midnight starting on Jan 1, 2021,
only run once in the event that days are missed, and
timeout after 60 minutes
And from the last line in the definition of the Etl DAG, we see:
[create_employees_table, create_employees_temp_table] >> get_data() >> merge_data()
the
merge_data()task depends on theget_data()task,the
get_data()depends on both thecreate_employees_tableandcreate_employees_temp_tabletasks, andthe
create_employees_tableandcreate_employees_temp_tabletasks can run independently.
Putting all of the pieces together, we have our completed DAG.
import datetime
import pendulum
import os

import requests
from airflow.decorators import dag, task
from airflow.providers.postgres.hooks.postgres import PostgresHook
from airflow.providers.postgres.operators.postgres import PostgresOperator


@dag(
    schedule_interval="0 0 * * *",
    start_date=pendulum.datetime(2021, 1, 1, tz="UTC"),
    catchup=False,
    dagrun_timeout=datetime.timedelta(minutes=60),
)
def Etl():
    create_employees_table = PostgresOperator(
        task_id="create_employees_table",
        postgres_conn_id="tutorial_pg_conn",
        sql="""
            CREATE TABLE IF NOT EXISTS employees (
                "Serial Number" NUMERIC PRIMARY KEY,
                "Company Name" TEXT,
                "Employee Markme" TEXT,
                "Description" TEXT,
                "Leave" INTEGER
            );""",
    )

    create_employees_temp_table = PostgresOperator(
        task_id="create_employees_temp_table",
        postgres_conn_id="tutorial_pg_conn",
        sql="""
            DROP TABLE IF EXISTS employees_temp;
            CREATE TABLE employees_temp (
                "Serial Number" NUMERIC PRIMARY KEY,
                "Company Name" TEXT,
                "Employee Markme" TEXT,
                "Description" TEXT,
                "Leave" INTEGER
            );""",
    )

    @task
    def get_data():
        # NOTE: configure this as appropriate for your airflow environment
        data_path = "/opt/airflow/dags/files/employees.csv"
        os.makedirs(os.path.dirname(data_path), exist_ok=True)

        url = "https://raw.githubusercontent.com/apache/airflow/main/docs/apache-airflow/pipeline_example.csv"

        response = requests.request("GET", url)

        with open(data_path, "w") as file:
            file.write(response.text)

        postgres_hook = PostgresHook(postgres_conn_id="tutorial_pg_conn")
        conn = postgres_hook.get_conn()
        cur = conn.cursor()
        with open(data_path, "r") as file:
            cur.copy_expert(
                "COPY employees_temp FROM STDIN WITH CSV HEADER DELIMITER AS ',' QUOTE '\"'",
                file,
            )
        conn.commit()

    @task
    def merge_data():
        query = """
            INSERT INTO employees
            SELECT *
            FROM (
                SELECT DISTINCT *
                FROM employees_temp
            )
            ON CONFLICT ("Serial Number") DO UPDATE
            SET "Serial Number" = excluded."Serial Number";
        """
        try:
            postgres_hook = PostgresHook(postgres_conn_id="tutorial_pg_conn")
            conn = postgres_hook.get_conn()
            cur = conn.cursor()
            cur.execute(query)
            conn.commit()
            return 0
        except Exception as e:
            return 1

    [create_employees_table, create_employees_temp_table] >> get_data() >> merge_data()


dag = Etl()
Save this code to a python file in the /dags folder (e.g. dags/etl.py) and (after a brief delay), the Etl DAG will be included in the list of available DAGs on the web UI.

You can trigger the Etl DAG by unpausing it (via the slider on the left end) and running it (via the Run button under Actions).
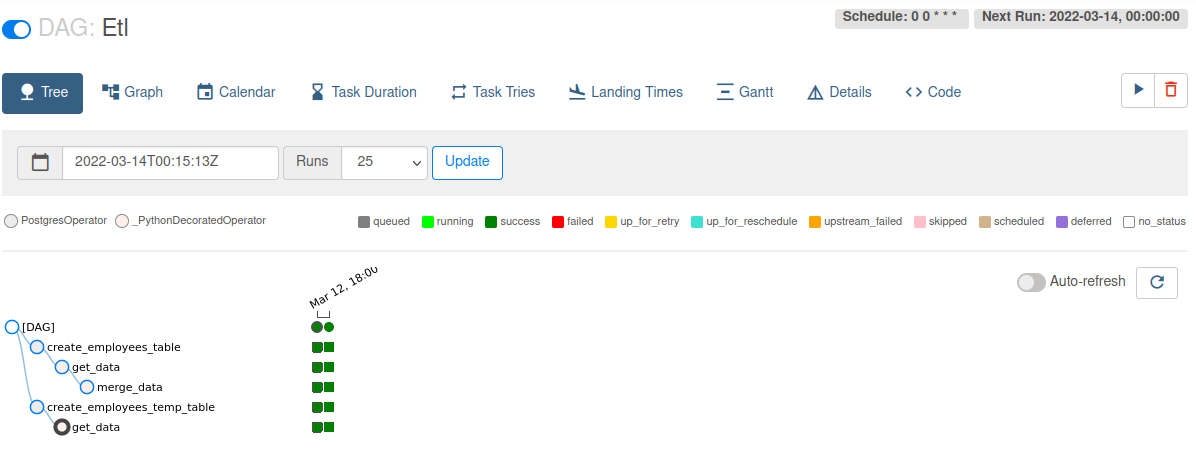
In the Etl DAG’s Tree view, we see all that all tasks ran successfully in all executed runs. Success!
What’s Next?
That’s it, you have written, tested and backfilled your very first Airflow pipeline. Merging your code into a code repository that has a master scheduler running against it should get it to get triggered and run every day.
Here’s a few things you might want to do next:
See also
Read the Concepts section for detailed explanation of Airflow concepts such as DAGs, Tasks, Operators, and more.
Take an in-depth tour of the UI - click all the things!
Keep reading the docs!
Review the how-to guides, which include a guide to writing your own operator
Review the Command Line Interface Reference
Review the List of operators
Review the Macros reference
Write your first pipeline!