Running Airflow in Docker
This quick-start guide will allow you to quickly get Airflow up and running with the CeleryExecutor in Docker.
Caution
This procedure can be useful for learning and exploration. However, adapting it for use in real-world situations can be complicated and the docker compose file does not provide any security guarantees required for production system. Making changes to this procedure will require specialized expertise in Docker & Docker Compose, and the Airflow community may not be able to help you.
For that reason, we recommend using Kubernetes with the Official Airflow Community Helm Chart when you are ready to run Airflow in production.
Before you begin
This procedure assumes familiarity with Docker and Docker Compose. If you haven’t worked with these tools before, you should take a moment to run through the Docker Quick Start (especially the section on Docker Compose) so you are familiar with how they work.
Follow these steps to install the necessary tools, if you have not already done so.
Install Docker Community Edition (CE) on your workstation. Depending on your OS, you may need to configure Docker to use at least 4.00 GB of memory for the Airflow containers to run properly. Please refer to the Resources section in the Docker for Windows or Docker for Mac documentation for more information.
Install Docker Compose v2.14.0 or newer on your workstation.
Older versions of docker-compose do not support all the features required by the Airflow docker-compose.yaml file, so double check that your version meets the minimum version requirements.
Tip
The default amount of memory available for Docker on macOS is often not enough to get Airflow up and running. If enough memory is not allocated, it might lead to the webserver continuously restarting. You should allocate at least 4GB memory for the Docker Engine (ideally 8GB).
You can check if you have enough memory by running this command:
docker run --rm "debian:bookworm-slim" bash -c 'numfmt --to iec $(echo $(($(getconf _PHYS_PAGES) * $(getconf PAGE_SIZE))))'
Warning
Some operating systems (Fedora, ArchLinux, RHEL, Rocky) have recently introduced Kernel changes that result in Airflow in Docker Compose consuming 100% memory when run inside the community Docker implementation maintained by the OS teams.
This is an issue with backwards-incompatible containerd configuration that some of Airflow dependencies have problems with and is tracked in a few issues:
There is no solution yet from the containerd team, but seems that installing Docker Desktop on Linux solves the problem as stated in This comment and allows to run Breeze with no problems.
Fetching docker-compose.yaml
To deploy Airflow on Docker Compose, you should fetch docker-compose.yaml.
curl -LfO 'https://airflow.apache.org/docs/apache-airflow/3.3.0/docker-compose.yaml'
Important
From July 2023 Compose V1 stopped receiving updates.
We strongly advise upgrading to a newer version of Docker Compose, supplied docker-compose.yaml may not function accurately within Compose V1.
This file contains several service definitions:
airflow-scheduler- The scheduler monitors all tasks and Dags, then triggers the task instances once their dependencies are complete.airflow-dag-processor- The Dag processor parses Dag files.airflow-api-server- The api server is available athttp://localhost:8080.airflow-worker- The worker that executes the tasks given by the scheduler.airflow-triggerer- The triggerer runs an event loop for deferrable tasks.airflow-init- The initialization service.postgres- The database.redis- The redis - broker that forwards messages from scheduler to worker.
Optionally, you can enable flower by adding --profile flower option, e.g. docker compose --profile flower up, or by explicitly specifying it on the command line e.g. docker compose up flower.
flower- The flower app for monitoring the environment. It is available athttp://localhost:5555.
All these services allow you to run Airflow with CeleryExecutor. For more information, see Architecture Overview.
Some directories in the container are mounted, which means that their contents are synchronized between your computer and the container.
./dags- you can put your Dag files here../logs- contains logs from task execution and scheduler../config- you can add custom log parser or addairflow_local_settings.pyto configure cluster policy../plugins- you can put your custom plugins here.
This file uses the latest Airflow image (apache/airflow). If you need to install a new Python library or system library, you can build your image.
Initializing Environment
Before starting Airflow for the first time, you need to prepare your environment, i.e. create the necessary files, directories and initialize the database.
Setting the right Airflow user
On Linux, the quick-start needs to know your host user id and needs to have group id set to 0.
Otherwise the files created in dags, logs, config and plugins will be created with
root user ownership. You have to make sure to configure them for the docker-compose:
mkdir -p ./dags ./logs ./plugins ./config
echo -e "AIRFLOW_UID=$(id -u)" > .env
See Docker Compose environment variables
For other operating systems, you may get a warning that AIRFLOW_UID is not set, but you can
safely ignore it. You can also manually create an .env file in the same folder as
docker-compose.yaml with this content to get rid of the warning:
AIRFLOW_UID=50000
Initialize airflow.cfg (Optional)
If you want to initialize airflow.cfg with default values before launching the airflow service, run.
docker compose run airflow-cli airflow config list
This will seed airflow.cfg with default values in config folder.
On systems with SELinux/AppArmor, you may run into permission issues. If this happens, edit your docker-compose.yaml file by added the suffix :z to all volumes:
volumes:
  - ${AIRFLOW_PROJ_DIR:-.}/dags:/opt/airflow/dags:z
  - ${AIRFLOW_PROJ_DIR:-.}/logs:/opt/airflow/logs:z
  - ${AIRFLOW_PROJ_DIR:-.}/config:/opt/airflow/config:z
  - ${AIRFLOW_PROJ_DIR:-.}/plugins:/opt/airflow/plugins:z
If, after this change, you are still experiencing permission issues when creating the airflow.cfg file, you can apply a very permissive setting to the config/ folder:
sudo chmod -R 777 ./config
Note that the above is a work around that should never be used in production.
Initialize the database
On all operating systems, you need to run database migrations and create the first user account. To do this, run.
docker compose up airflow-init
After initialization is complete, you should see output related to files, folders, and plug-ins and finally a message like this:
airflow-init-1 exited with code 0
The account created has the login airflow and the password airflow.
Cleaning-up the environment
The docker-compose environment we have prepared is a “quick-start” one. It was not designed to be used in production and it has a number of caveats - one of them being that the best way to recover from any problem is to clean it up and restart from scratch.
The best way to do this is to:
Run
docker compose down --volumes --remove-orphanscommand in the directory you downloaded thedocker-compose.yamlfileRemove the entire directory where you downloaded the
docker-compose.yamlfilerm -rf '<DIRECTORY>'Run through this guide from the very beginning, starting by re-downloading the
docker-compose.yamlfile
Running Airflow
Now you can start all services:
docker compose up
Note
docker-compose is old syntax. Please check Stackoverflow.
In a second terminal you can check the condition of the containers and make sure that no containers are in an unhealthy condition:
$ docker ps
CONTAINER ID   IMAGE                  COMMAND                  CREATED          STATUS                    PORTS                              NAMES
247ebe6cf87a   apache/airflow:3.3.0   "/usr/bin/dumb-init …"   3 minutes ago    Up 3 minutes (healthy)    8080/tcp                           compose_airflow-worker_1
ed9b09fc84b1   apache/airflow:3.3.0   "/usr/bin/dumb-init …"   3 minutes ago    Up 3 minutes (healthy)    8080/tcp                           compose_airflow-scheduler_1
7cb1fb603a98   apache/airflow:3.3.0   "/usr/bin/dumb-init …"   3 minutes ago    Up 3 minutes (healthy)    0.0.0.0:8080->8080/tcp             compose_airflow-api_server_1
74f3bbe506eb   postgres:16            "docker-entrypoint.s…"   18 minutes ago   Up 17 minutes (healthy)   5432/tcp                           compose_postgres_1
0bd6576d23cb   redis:latest           "docker-entrypoint.s…"   10 hours ago     Up 17 minutes (healthy)   0.0.0.0:6379->6379/tcp             compose_redis_1
Accessing the environment
After starting Airflow, you can interact with it in 3 ways:
by running CLI commands.
via a browser using the web interface.
using the REST API.
Running the CLI commands
You can also run CLI commands, but you have to do it in one of the defined airflow-* services. For example, to run airflow info, run the following command:
docker compose run airflow-worker airflow info
If you have Linux or Mac OS, you can make your work easier and download a optional wrapper scripts that will allow you to run commands with a simpler command.
curl -LfO 'https://airflow.apache.org/docs/apache-airflow/3.3.0/airflow.sh'
chmod +x airflow.sh
Now you can run commands easier.
./airflow.sh info
You can also use bash as parameter to enter interactive bash shell in the container or python to enter
python container.
./airflow.sh bash
./airflow.sh python
Accessing the web interface
Once the cluster has started up, you can log in to the web interface and begin experimenting with Dags.
The webserver is available at: http://localhost:8080.
The default account has the login airflow and the password airflow.
Sending requests to the REST API
Basic username password authentication is currently supported for the REST API, which means you can use common tools to send requests to the API.
The webserver is available at: http://localhost:8080.
The default account has the login airflow and the password airflow.
Here is a sample curl command, which sends a request to retrieve a pool list:
ENDPOINT_URL="http://localhost:8080"
JWT_TOKEN=$(curl -s -X POST ${ENDPOINT_URL}/auth/token \
                 -H "Content-Type: application/json" \
                 -d '{"username": "airflow", "password": "airflow"}' |\
            jq -r '.access_token' \
          )
curl -X GET \
    "${ENDPOINT_URL}/api/v2/pools" \
    -H "Authorization: Bearer ${JWT_TOKEN}"
Cleaning up
To stop and delete containers, delete volumes with database data and download images, run:
docker compose down --volumes --rmi all
Using custom images
When you want to run Airflow locally, you might want to use an extended image, containing some additional dependencies - for
example you might add new python packages, or upgrade airflow providers to a later version. This can be done very easily
by specifying build: . in your docker-compose.yaml and placing a custom Dockerfile alongside your
docker-compose.yaml. Then you can use docker compose build command
to build your image (you need to do it only once). You can also add the --build flag to your docker compose commands
to rebuild the images on-the-fly when you run other docker compose commands.
Examples of how you can extend the image with custom providers, python packages, apt packages and more can be found in Building the image.
Note
Creating custom images means that you need to maintain also a level of automation as you need to re-create the images when either the packages you want to install or Airflow is upgraded. Please do not forget about keeping these scripts. Also keep in mind, that in cases when you run pure Python tasks, you can use Python Virtualenv functions, which will dynamically source and install python dependencies during runtime. With Airflow 2.8.0, virtualenvs can also be cached.
Special case - adding dependencies via requirements.txt file
Usual case for custom images, is when you want to add a set of requirements to it - usually stored in
requirements.txt file. For development, you might be tempted to add it dynamically when you are
starting the original airflow image, but this has a number of side effects (for example your containers
will start much slower - each additional dependency will further delay your containers start up time).
Also it is completely unnecessary, because docker compose has the development workflow built-in.
You can - following the previous chapter, automatically build and use your custom image when you
iterate with docker compose locally. Specifically when you want to add your own requirement file,
you should do those steps:
Comment out the
image: ...line and remove comment from thebuild: .line in thedocker-compose.yamlfile. The relevant part of the docker-compose file of yours should look similar to (use correct image tag):
#image: ${AIRFLOW_IMAGE_NAME:-apache/airflow:3.3.0}
build: .
Create
Dockerfilein the same folder yourdocker-compose.yamlfile is with content similar to:
FROM apache/airflow:3.3.0
ADD requirements.txt .
RUN pip install apache-airflow==${AIRFLOW_VERSION} -r requirements.txt
It is the best practice to install apache-airflow in the same version as the one that comes from the
original image. This way you can be sure that pip will not try to downgrade or upgrade apache
airflow while installing other requirements, which might happen in case you try to add a dependency
that conflicts with the version of apache-airflow that you are using.
Place
requirements.txtfile in the same directory.
Run docker compose build to build the image, or add --build flag to docker compose up or
docker compose run commands to build the image automatically as needed.
Special case - Adding a custom config file
If you have a custom config file and wish to use it in your Airflow instance, you need to perform the following steps:
Replace the auto-generated
airflow.cfgfile in the local config folder with your custom config file.If your config file has a different name than
airflow.cfg, adjust the filename inAIRFLOW_CONFIG: '/opt/airflow/config/airflow.cfg'
Networking
In general, if you want to use Airflow locally, your Dags may try to connect to servers which are running on the host. In order to achieve that, an extra configuration must be added in docker-compose.yaml. For example, on Linux the configuration must be in the section services: airflow-worker adding extra_hosts: - "host.docker.internal:host-gateway"; and use host.docker.internal instead of localhost. This configuration vary in different platforms. Please check the Docker documentation for Windows and Mac for further information.
Debug Airflow inside docker container using PyCharm
Prerequisites: Create a project in PyCharm and download the (docker-compose.yaml).
Steps:
Modify
docker-compose.yamlAdd the following section under the
servicessection:
airflow-python:
  <<: *airflow-common
  profiles:
      - debug
  environment:
      <<: *airflow-common-env
  user: "50000:0"
  entrypoint: [ "/bin/bash", "-c" ]
Note
This code snippet creates a new service named “airflow-python” specifically for PyCharm’s Python interpreter.
On a Linux system, if you have executed the command echo -e "AIRFLOW_UID=$(id -u)" > .env, you need to set user: "50000:0" in airflow-python service to avoid PyCharm’s Unresolved reference 'airflow' error.
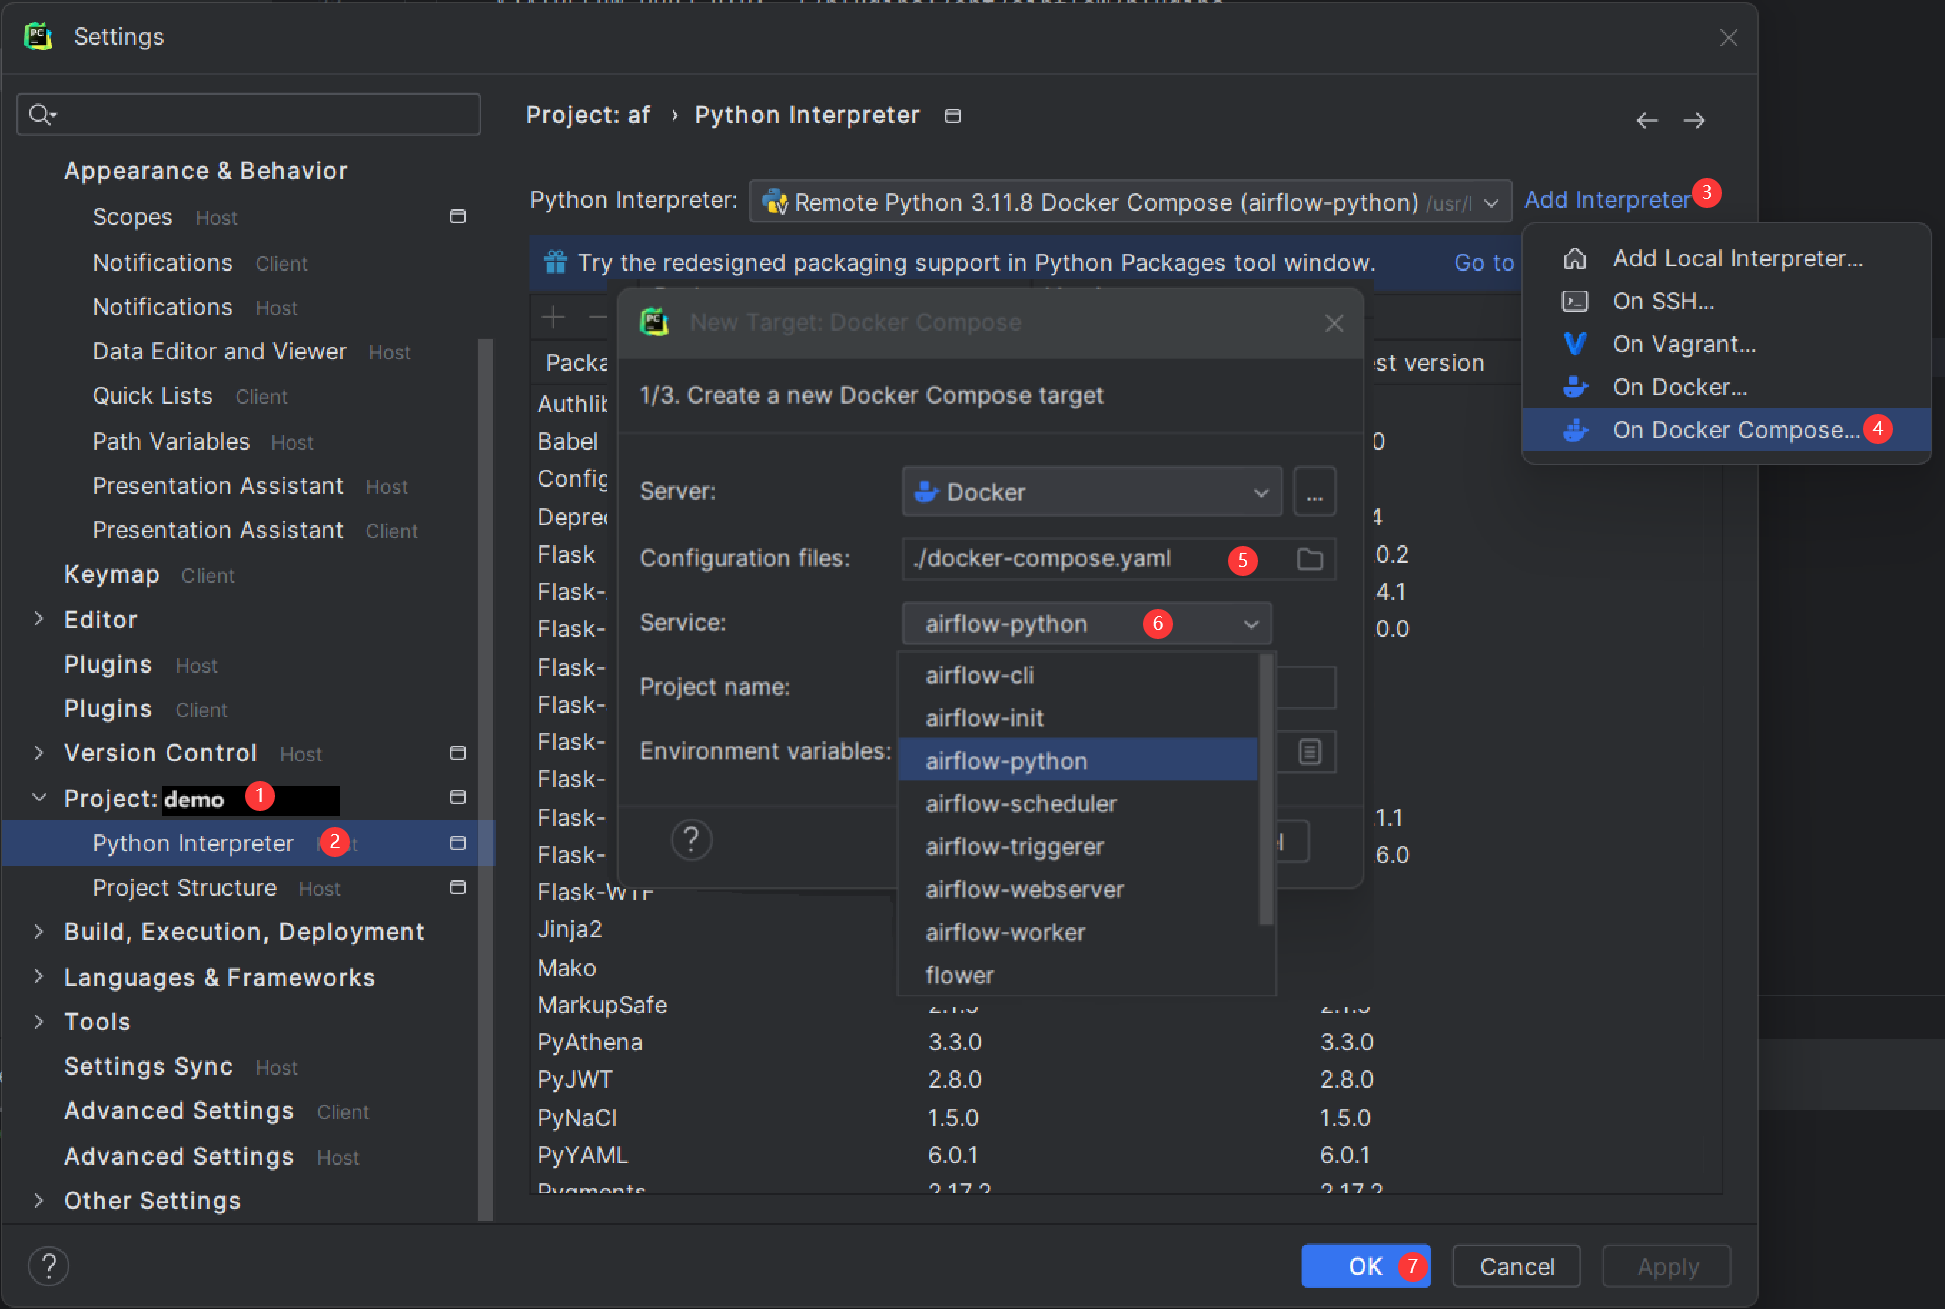
Configure PyCharm Interpreter
Open PyCharm and navigate to Settings > Project: <Your Project Name> > Python Interpreter.
Click the “Add Interpreter” button and choose “On Docker Compose”.
In the Configuration file field, select your
docker-compose.yamlfile.In the Service field, choose the newly added
airflow-pythonservice.Click “Next” and follow the prompts to complete the configuration.
Building the interpreter index might take some time.
3) Add exec to docker-compose/command and actions in python service
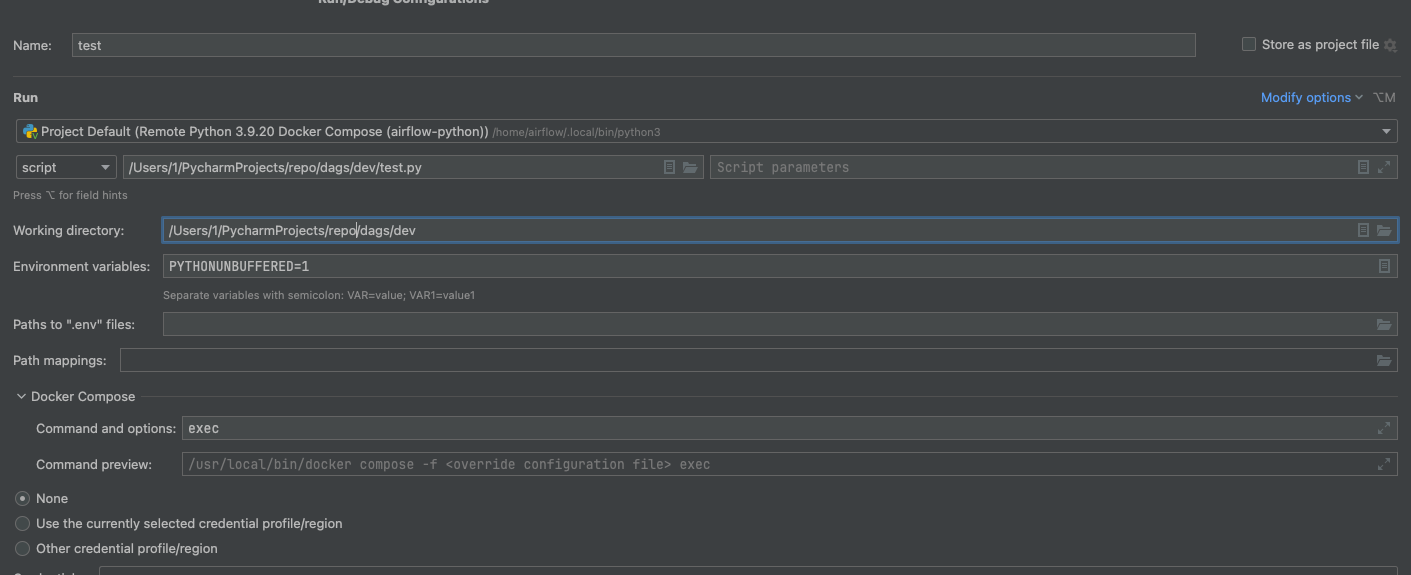
Once configured, you can debug your Airflow code within the container environment, mimicking your local setup.
FAQ: Frequently asked questions
ModuleNotFoundError: No module named 'XYZ'
The Docker Compose file uses the latest Airflow image (apache/airflow). If you need to install a new Python library or system library, you can customize and extend it.
What’s Next?
From this point, you can head to the Tutorials section for further examples or the How-to Guides section if you’re ready to get your hands dirty.
Environment variables supported by Docker Compose
Do not confuse the variable names here with the build arguments set when image is built. The
AIRFLOW_UID build arg defaults to 50000 when the image is built, so it is
“baked” into the image. On the other hand, the environment variables below can be set when the container
is running, using - for example - result of id -u command, which allows to use the dynamic host
runtime user id which is unknown at the time of building the image.
Variable |
Description |
Default |
|---|---|---|
|
Airflow Image to use. |
apache/airflow:3.3.0 |
|
UID of the user to run Airflow containers as.
Override if you want to use non-default Airflow
UID (for example when you map folders from host,
it should be set to result of |
|
Note
Before Airflow 2.2, the Docker Compose also had AIRFLOW_GID parameter, but it did not provide any additional
functionality - only added confusion - so it has been removed.
Those additional variables are useful in case you are trying out/testing Airflow installation via Docker Compose. They are not intended to be used in production, but they make the environment faster to bootstrap for first time users with the most common customizations.
Variable |
Description |
Default |
|---|---|---|
|
Username for the administrator UI account. If this value is specified, admin UI user gets created automatically. This is only useful when you want to run Airflow for a test-drive and want to start a container with embedded development database. |
airflow |
|
Password for the administrator UI account.
Only used when |
airflow |
|
If not empty, airflow containers will attempt to
install requirements specified in the variable.
example: |