
DAGs
A DAG (Directed Acyclic Graph) is the core concept of Airflow, collecting Tasks together, organized with dependencies and relationships to say how they should run.
Here’s a basic example DAG:
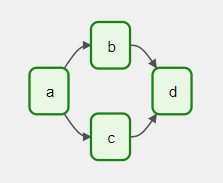
It defines four Tasks - A, B, C, and D - and dictates the order in which they have to run, and which tasks depend on what others. It will also say how often to run the DAG - maybe “every 5 minutes starting tomorrow”, or “every day since January 1st, 2020”.
The DAG itself doesn’t care about what is happening inside the tasks; it is merely concerned with how to execute them - the order to run them in, how many times to retry them, if they have timeouts, and so on.
Declaring a DAG
There are three ways to declare a DAG - either you can use a context manager, which will add the DAG to anything inside it implicitly:
with DAG(
    "my_dag_name", start_date=pendulum.datetime(2021, 1, 1, tz="UTC"),
    schedule_interval="@daily", catchup=False
) as dag:
    op = EmptyOperator(task_id="task")
Or, you can use a standard constructor, passing the dag into any operators you use:
my_dag = DAG("my_dag_name", start_date=pendulum.datetime(2021, 1, 1, tz="UTC"),
             schedule_interval="@daily", catchup=False)
op = EmptyOperator(task_id="task", dag=my_dag)
Or, you can use the @dag decorator to turn a function into a DAG generator:
@dag(start_date=pendulum.datetime(2021, 1, 1, tz="UTC"),
     schedule_interval="@daily", catchup=False)
def generate_dag():
    op = EmptyOperator(task_id="task")

dag = generate_dag()
DAGs are nothing without Tasks to run, and those will usually either come in the form of either Operators, Sensors or TaskFlow.
Task Dependencies
A Task/Operator does not usually live alone; it has dependencies on other tasks (those upstream of it), and other tasks depend on it (those downstream of it). Declaring these dependencies between tasks is what makes up the DAG structure (the edges of the directed acyclic graph).
There are two main ways to declare individual task dependencies. The recommended one is to use the >> and << operators:
first_task >> [second_task, third_task]
third_task << fourth_task
Or, you can also use the more explicit set_upstream and set_downstream methods:
first_task.set_downstream(second_task, third_task)
third_task.set_upstream(fourth_task)
There are also shortcuts to declaring more complex dependencies. If you want to make two lists of tasks depend on all parts of each other, you can’t use either of the approaches above, so you need to use cross_downstream:
from airflow.models.baseoperator import cross_downstream

# Replaces
# [op1, op2] >> op3
# [op1, op2] >> op4
cross_downstream([op1, op2], [op3, op4])
And if you want to chain together dependencies, you can use chain:
from airflow.models.baseoperator import chain

# Replaces op1 >> op2 >> op3 >> op4
chain(op1, op2, op3, op4)

# You can also do it dynamically
chain(*[EmptyOperator(task_id='op' + i) for i in range(1, 6)])
Chain can also do pairwise dependencies for lists the same size (this is different to the cross dependencies done by cross_downstream!):
from airflow.models.baseoperator import chain

# Replaces
# op1 >> op2 >> op4 >> op6
# op1 >> op3 >> op5 >> op6
chain(op1, [op2, op3], [op4, op5], op6)
Loading DAGs
Airflow loads DAGs from Python source files, which it looks for inside its configured DAG_FOLDER. It will take each file, execute it, and then load any DAG objects from that file.
This means you can define multiple DAGs per Python file, or even spread one very complex DAG across multiple Python files using imports.
Note, though, that when Airflow comes to load DAGs from a Python file, it will only pull any objects at the top level that are a DAG instance. For example, take this DAG file:
dag_1 = DAG('this_dag_will_be_discovered')

def my_function():
    dag_2 = DAG('but_this_dag_will_not')

my_function()
While both DAG constructors get called when the file is accessed, only dag_1 is at the top level (in the globals()), and so only it is added to Airflow. dag_2 is not loaded.
Note
When searching for DAGs inside the DAG_FOLDER, Airflow only considers Python files that contain the strings airflow and dag (case-insensitively) as an optimization.
To consider all Python files instead, disable the DAG_DISCOVERY_SAFE_MODE configuration flag.
You can also provide an .airflowignore file inside your DAG_FOLDER, or any of its subfolders, which describes patterns of files for the loader to ignore. It covers the directory it’s in plus all subfolders underneath it. See .airflowignore below for details of the file syntax.
Running DAGs
DAGs will run in one of two ways:
When they are triggered either manually or via the API
On a defined schedule, which is defined as part of the DAG
DAGs do not require a schedule, but it’s very common to define one. You define it via the schedule_interval argument, like this:
with DAG("my_daily_dag", schedule_interval="@daily"):
    ...
The schedule_interval argument takes any value that is a valid Crontab schedule value, so you could also do:
with DAG("my_daily_dag", schedule_interval="0 * * * *"):
    ...
Tip
For more information on schedule_interval values, see DAG Run.
If schedule_interval is not enough to express the DAG’s schedule, see Timetables.
For more information on logical date, see Data Interval and
What does execution_date mean?.
Every time you run a DAG, you are creating a new instance of that DAG which Airflow calls a DAG Run. DAG Runs can run in parallel for the same DAG, and each has a defined data interval, which identifies the period of data the tasks should operate on.
As an example of why this is useful, consider writing a DAG that processes a daily set of experimental data. It’s been rewritten, and you want to run it on the previous 3 months of data—no problem, since Airflow can backfill the DAG and run copies of it for every day in those previous 3 months, all at once.
Those DAG Runs will all have been started on the same actual day, but each DAG run will have one data interval covering a single day in that 3 month period, and that data interval is all the tasks, operators and sensors inside the DAG look at when they run.
In much the same way a DAG instantiates into a DAG Run every time it’s run, Tasks specified inside a DAG are also instantiated into Task Instances along with it.
A DAG run will have a start date when it starts, and end date when it ends. This period describes the time when the DAG actually ‘ran.’ Aside from the DAG run’s start and end date, there is another date called logical date (formally known as execution date), which describes the intended time a DAG run is scheduled or triggered. The reason why this is called logical is because of the abstract nature of it having multiple meanings, depending on the context of the DAG run itself.
For example, if a DAG run is manually triggered by the user, its logical date would be the date and time of which the DAG run was triggered, and the value should be equal to DAG run’s start date. However, when the DAG is being automatically scheduled, with certain schedule interval put in place, the logical date is going to indicate the time at which it marks the start of the data interval, where the DAG run’s start date would then be the logical date + scheduled interval.
DAG Assignment
Note that every single Operator/Task must be assigned to a DAG in order to run. Airflow has several ways of calculating the DAG without you passing it explicitly:
If you declare your Operator inside a
with DAGblockIf you declare your Operator inside a
@dagdecorator,If you put your Operator upstream or downstream of a Operator that has a DAG
Otherwise, you must pass it into each Operator with dag=.
Default Arguments
Often, many Operators inside a DAG need the same set of default arguments (such as their retries). Rather than having to specify this individually for every Operator, you can instead pass default_args to the DAG when you create it, and it will auto-apply them to any operator tied to it:
import pendulum

with DAG(
    dag_id='my_dag',
    start_date=pendulum.datetime(2016, 1, 1, tz="UTC"),
    schedule_interval='@daily',
    catchup=False,
    default_args={'retries': 2},
) as dag:
    op = BashOperator(task_id='dummy', bash_command='Hello World!')
    print(op.retries)  # 2
The DAG decorator
New in version 2.0.
As well as the more traditional ways of declaring a single DAG using a context manager or the DAG() constructor, you can also decorate a function with @dag to turn it into a DAG generator function:
@dag(
    schedule_interval=None,
    start_date=pendulum.datetime(2021, 1, 1, tz="UTC"),
    catchup=False,
    tags=['example'],
)
def example_dag_decorator(email: str = 'example@example.com'):
    """
    DAG to send server IP to email.

    :param email: Email to send IP to. Defaults to example@example.com.
    """
    get_ip = GetRequestOperator(task_id='get_ip', url="http://httpbin.org/get")

    @task(multiple_outputs=True)
    def prepare_email(raw_json: Dict[str, Any]) -> Dict[str, str]:
        external_ip = raw_json['origin']
        return {
            'subject': f'Server connected from {external_ip}',
            'body': f'Seems like today your server executing Airflow is connected from IP {external_ip}<br>',
        }

    email_info = prepare_email(get_ip.output)

    EmailOperator(
        task_id='send_email', to=email, subject=email_info['subject'], html_content=email_info['body']
    )


dag = example_dag_decorator()
As well as being a new way of making DAGs cleanly, the decorator also sets up any parameters you have in your function as DAG parameters, letting you set those parameters when triggering the DAG. You can then access the parameters from Python code, or from {{ context.params }} inside a Jinja template.
Note
Airflow will only load DAGs that appear in the top level of a DAG file. This means you cannot just declare a function with @dag - you must also call it at least once in your DAG file and assign it to a top-level object, as you can see in the example above.
Control Flow
By default, a DAG will only run a Task when all the Tasks it depends on are successful. There are several ways of modifying this, however:
Branching, where you can select which Task to move onto based on a condition
Latest Only, a special form of branching that only runs on DAGs running against the present
Depends On Past, where tasks can depend on themselves from a previous run
Trigger Rules, which let you set the conditions under which a DAG will run a task.
Branching
You can make use of branching in order to tell the DAG not to run all dependent tasks, but instead to pick and choose one or more paths to go down. This is where the branching Operators come in.
The BranchPythonOperator is much like the PythonOperator except that it expects a python_callable that returns a task_id (or list of task_ids). The task_id returned is followed, and all of the other paths are skipped. It can also return None to skip all downstream task.
The task_id returned by the Python function has to reference a task directly downstream from the BranchPythonOperator task.
Note
When a Task is downstream of both the branching operator and downstream of one or more of the selected tasks, it will not be skipped:
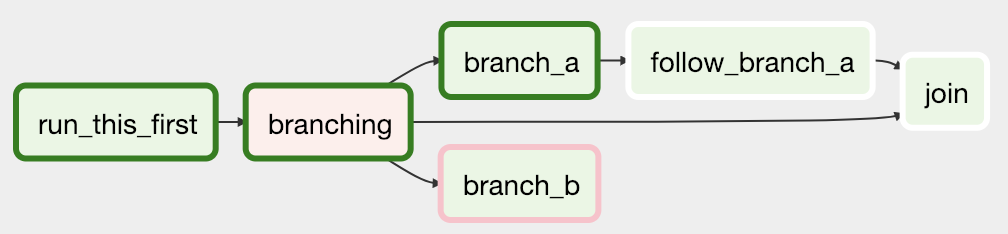
The paths of the branching task are branch_a, join and branch_b. Since join is a downstream task of branch_a, it will still be run, even though it was not returned as part of the branch decision.
The BranchPythonOperator can also be used with XComs allowing branching context to dynamically decide what branch to follow based on upstream tasks. For example:
def branch_func(ti):
    xcom_value = int(ti.xcom_pull(task_ids="start_task"))
    if xcom_value >= 5:
        return "continue_task"
    elif xcom_value >= 3:
        return "stop_task"
    else:
        return None


start_op = BashOperator(
    task_id="start_task",
    bash_command="echo 5",
    xcom_push=True,
    dag=dag,
)

branch_op = BranchPythonOperator(
    task_id="branch_task",
    python_callable=branch_func,
    dag=dag,
)

continue_op = EmptyOperator(task_id="continue_task", dag=dag)
stop_op = EmptyOperator(task_id="stop_task", dag=dag)

start_op >> branch_op >> [continue_op, stop_op]
If you wish to implement your own operators with branching functionality, you can inherit from BaseBranchOperator, which behaves similarly to BranchPythonOperator but expects you to provide an implementation of the method choose_branch.
As with the callable for BranchPythonOperator, this method can return the ID of a downstream task, or a list of task IDs, which will be run, and all others will be skipped. It can also return None to skip all downstream task:
class MyBranchOperator(BaseBranchOperator):
    def choose_branch(self, context):
        """
        Run an extra branch on the first day of the month
        """
        if context['data_interval_start'].day == 1:
            return ['daily_task_id', 'monthly_task_id']
        elif context['data_interval_start'].day == 2:
            return 'daily_task_id'
        else:
            return None
Latest Only
Airflow’s DAG Runs are often run for a date that is not the same as the current date - for example, running one copy of a DAG for every day in the last month to backfill some data.
There are situations, though, where you don’t want to let some (or all) parts of a DAG run for a previous date; in this case, you can use the LatestOnlyOperator.
This special Operator skips all tasks downstream of itself if you are not on the “latest” DAG run (if the wall-clock time right now is between its execution_time and the next scheduled execution_time, and it was not an externally-triggered run).
Here’s an example:
import datetime

import pendulum

from airflow import DAG
from airflow.operators.empty import EmptyOperator
from airflow.operators.latest_only import LatestOnlyOperator
from airflow.utils.trigger_rule import TriggerRule

with DAG(
    dag_id='latest_only_with_trigger',
    schedule_interval=datetime.timedelta(hours=4),
    start_date=pendulum.datetime(2021, 1, 1, tz="UTC"),
    catchup=False,
    tags=['example3'],
) as dag:
    latest_only = LatestOnlyOperator(task_id='latest_only')
    task1 = EmptyOperator(task_id='task1')
    task2 = EmptyOperator(task_id='task2')
    task3 = EmptyOperator(task_id='task3')
    task4 = EmptyOperator(task_id='task4', trigger_rule=TriggerRule.ALL_DONE)

    latest_only >> task1 >> [task3, task4]
    task2 >> [task3, task4]
In the case of this DAG:
task1is directly downstream oflatest_onlyand will be skipped for all runs except the latest.task2is entirely independent oflatest_onlyand will run in all scheduled periodstask3is downstream oftask1andtask2and because of the default trigger rule beingall_successwill receive a cascaded skip fromtask1.task4is downstream oftask1andtask2, but it will not be skipped, since itstrigger_ruleis set toall_done.

Depends On Past
You can also say a task can only run if the previous run of the task in the previous DAG Run succeeded. To use this, you just need to set the depends_on_past argument on your Task to True.
Note that if you are running the DAG at the very start of its life—specifically, its first ever automated run—then the Task will still run, as there is no previous run to depend on.
Trigger Rules
By default, Airflow will wait for all upstream (direct parents) tasks for a task to be successful before it runs that task.
However, this is just the default behaviour, and you can control it using the trigger_rule argument to a Task. The options for trigger_rule are:
all_success(default): All upstream tasks have succeededall_failed: All upstream tasks are in afailedorupstream_failedstateall_done: All upstream tasks are done with their executionall_skipped: All upstream tasks are in askippedstateone_failed: At least one upstream task has failed (does not wait for all upstream tasks to be done)one_success: At least one upstream task has succeeded (does not wait for all upstream tasks to be done)none_failed: All upstream tasks have notfailedorupstream_failed- that is, all upstream tasks have succeeded or been skippednone_failed_min_one_success: All upstream tasks have notfailedorupstream_failed, and at least one upstream task has succeeded.none_skipped: No upstream task is in askippedstate - that is, all upstream tasks are in asuccess,failed, orupstream_failedstatealways: No dependencies at all, run this task at any time
You can also combine this with the Depends On Past functionality if you wish.
Note
It’s important to be aware of the interaction between trigger rules and skipped tasks, especially tasks that are skipped as part of a branching operation. You almost never want to use all_success or all_failed downstream of a branching operation.
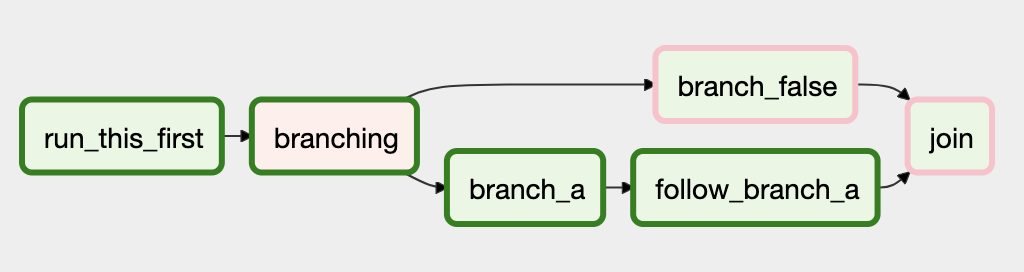
Skipped tasks will cascade through trigger rules all_success and all_failed, and cause them to skip as well. Consider the following DAG:
# dags/branch_without_trigger.py
import pendulum

from airflow.models import DAG
from airflow.operators.empty import EmptyOperator
from airflow.operators.python import BranchPythonOperator

dag = DAG(
    dag_id="branch_without_trigger",
    schedule_interval="@once",
    start_date=pendulum.datetime(2019, 2, 28, tz="UTC"),
)

run_this_first = EmptyOperator(task_id="run_this_first", dag=dag)
branching = BranchPythonOperator(
    task_id="branching", dag=dag, python_callable=lambda: "branch_a"
)

branch_a = EmptyOperator(task_id="branch_a", dag=dag)
follow_branch_a = EmptyOperator(task_id="follow_branch_a", dag=dag)

branch_false = EmptyOperator(task_id="branch_false", dag=dag)

join = EmptyOperator(task_id="join", dag=dag)

run_this_first >> branching
branching >> branch_a >> follow_branch_a >> join
branching >> branch_false >> join
join is downstream of follow_branch_a and branch_false. The join task will show up as skipped because its trigger_rule is set to all_success by default, and the skip caused by the branching operation cascades down to skip a task marked as all_success.
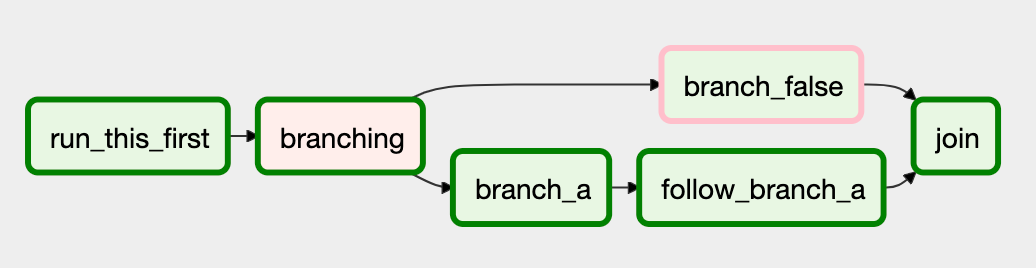
By setting trigger_rule to none_failed_min_one_success in the join task, we can instead get the intended behaviour:
Dynamic DAGs
Since a DAG is defined by Python code, there is no need for it to be purely declarative; you are free to use loops, functions, and more to define your DAG.
For example, here is a DAG that uses a for loop to define some Tasks:
with DAG("loop_example") as dag:

    first = EmptyOperator(task_id="first")
    last = EmptyOperator(task_id="last")

    options = ["branch_a", "branch_b", "branch_c", "branch_d"]
    for option in options:
        t = EmptyOperator(task_id=option)
        first >> t >> last
In general, we advise you to try and keep the topology (the layout) of your DAG tasks relatively stable; dynamic DAGs are usually better used for dynamically loading configuration options or changing operator options.
DAG Visualization
If you want to see a visual representation of a DAG, you have two options:
You can load up the Airflow UI, navigate to your DAG, and select “Graph”
You can run
airflow dags show, which renders it out as an image file
We generally recommend you use the Graph view, as it will also show you the state of all the Task Instances within any DAG Run you select.
Of course, as you develop out your DAGs they are going to get increasingly complex, so we provide a few ways to modify these DAG views to make them easier to understand.
TaskGroups
A TaskGroup can be used to organize tasks into hierarchical groups in Graph view. It is useful for creating repeating patterns and cutting down visual clutter.
Unlike SubDAGs, TaskGroups are purely a UI grouping concept. Tasks in TaskGroups live on the same original DAG, and honor all the DAG settings and pool configurations.
Dependency relationships can be applied across all tasks in a TaskGroup with the >> and << operators. For example, the following code puts task1 and task2 in TaskGroup group1 and then puts both tasks upstream of task3:
with TaskGroup("group1") as group1:
    task1 = EmptyOperator(task_id="task1")
    task2 = EmptyOperator(task_id="task2")

task3 = EmptyOperator(task_id="task3")

group1 >> task3
TaskGroup also supports default_args like DAG, it will overwrite the default_args in DAG level:
import pendulum

with DAG(
    dag_id='dag1',
    start_date=pendulum.datetime(2016, 1, 1, tz="UTC"),
    schedule_interval="@daily",
    catchup=False,
    default_args={'retries': 1},
):
    with TaskGroup('group1', default_args={'retries': 3}):
        task1 = EmptyOperator(task_id='task1')
        task2 = BashOperator(task_id='task2', bash_command='echo Hello World!', retries=2)
        print(task1.retries) # 3
        print(task2.retries) # 2
If you want to see a more advanced use of TaskGroup, you can look at the example_task_group.py example DAG that comes with Airflow.
Note
By default, child tasks/TaskGroups have their IDs prefixed with the group_id of their parent TaskGroup. This helps to ensure uniqueness of group_id and task_id throughout the DAG.
To disable the prefixing, pass prefix_group_id=False when creating the TaskGroup, but note that you will now be responsible for ensuring every single task and group has a unique ID of its own.
Edge Labels
As well as grouping tasks into groups, you can also label the dependency edges between different tasks in the Graph view - this can be especially useful for branching areas of your DAG, so you can label the conditions under which certain branches might run.
To add labels, you can use them directly inline with the >> and << operators:
from airflow.utils.edgemodifier import Label

my_task >> Label("When empty") >> other_task
Or, you can pass a Label object to set_upstream/set_downstream:
from airflow.utils.edgemodifier import Label

my_task.set_downstream(other_task, Label("When empty"))
Here’s an example DAG which illustrates labeling different branches:

with DAG(
    "example_branch_labels",
    schedule_interval="@daily",
    start_date=pendulum.datetime(2021, 1, 1, tz="UTC"),
    catchup=False,
) as dag:
    ingest = EmptyOperator(task_id="ingest")
    analyse = EmptyOperator(task_id="analyze")
    check = EmptyOperator(task_id="check_integrity")
    describe = EmptyOperator(task_id="describe_integrity")
    error = EmptyOperator(task_id="email_error")
    save = EmptyOperator(task_id="save")
    report = EmptyOperator(task_id="report")

    ingest >> analyse >> check
    check >> Label("No errors") >> save >> report
    check >> Label("Errors found") >> describe >> error >> report
DAG & Task Documentation
It’s possible to add documentation or notes to your DAGs & task objects that are visible in the web interface (“Graph” & “Tree” for DAGs, “Task Instance Details” for tasks).
There are a set of special task attributes that get rendered as rich content if defined:
attribute |
rendered to |
|---|---|
doc |
monospace |
doc_json |
json |
doc_yaml |
yaml |
doc_md |
markdown |
doc_rst |
reStructuredText |
Please note that for DAGs, doc_md is the only attribute interpreted.
This is especially useful if your tasks are built dynamically from configuration files, as it allows you to expose the configuration that led to the related tasks in Airflow:
"""
### My great DAG
"""
import pendulum

dag = DAG(
    "my_dag",
    start_date=pendulum.datetime(2021, 1, 1, tz="UTC"),
    schedule_interval="@daily",
    catchup=False,
)
dag.doc_md = __doc__

t = BashOperator("foo", dag=dag)
t.doc_md = """\
#Title"
Here's a [url](www.airbnb.com)
"""
SubDAGs
Sometimes, you will find that you are regularly adding exactly the same set of tasks to every DAG, or you want to group a lot of tasks into a single, logical unit. This is what SubDAGs are for.
For example, here’s a DAG that has a lot of parallel tasks in two sections:
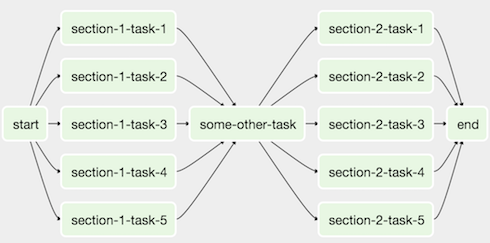
We can combine all of the parallel task-* operators into a single SubDAG, so that the resulting DAG resembles the following:

Note that SubDAG operators should contain a factory method that returns a DAG object. This will prevent the SubDAG from being treated like a separate DAG in the main UI - remember, if Airflow sees a DAG at the top level of a Python file, it will load it as its own DAG. For example:
import pendulum

from airflow import DAG
from airflow.operators.empty import EmptyOperator


def subdag(parent_dag_name, child_dag_name, args):
    """
    Generate a DAG to be used as a subdag.

    :param str parent_dag_name: Id of the parent DAG
    :param str child_dag_name: Id of the child DAG
    :param dict args: Default arguments to provide to the subdag
    :return: DAG to use as a subdag
    :rtype: airflow.models.DAG
    """
    dag_subdag = DAG(
        dag_id=f'{parent_dag_name}.{child_dag_name}',
        default_args=args,
        start_date=pendulum.datetime(2021, 1, 1, tz="UTC"),
        catchup=False,
        schedule_interval="@daily",
    )

    for i in range(5):
        EmptyOperator(
            task_id=f'{child_dag_name}-task-{i + 1}',
            default_args=args,
            dag=dag_subdag,
        )

    return dag_subdag
This SubDAG can then be referenced in your main DAG file:
airflow/example_dags/example_subdag_operator.py
from airflow import DAG
from airflow.example_dags.subdags.subdag import subdag
from airflow.operators.empty import EmptyOperator
from airflow.operators.subdag import SubDagOperator
from airflow.utils.dates import days_ago

DAG_NAME = 'example_subdag_operator'

with DAG(
    dag_id=DAG_NAME,
    default_args={"retries": 2},
    start_date=days_ago(2),
    schedule_interval="@once",
    tags=['example'],
) as dag:

    start = EmptyOperator(
        task_id='start',
    )

    section_1 = SubDagOperator(
        task_id='section-1',
        subdag=subdag(DAG_NAME, 'section-1', dag.default_args),
    )

    some_other_task = EmptyOperator(
        task_id='some-other-task',
    )

    section_2 = SubDagOperator(
        task_id='section-2',
        subdag=subdag(DAG_NAME, 'section-2', dag.default_args),
    )

    end = EmptyOperator(
        task_id='end',
    )

    start >> section_1 >> some_other_task >> section_2 >> end
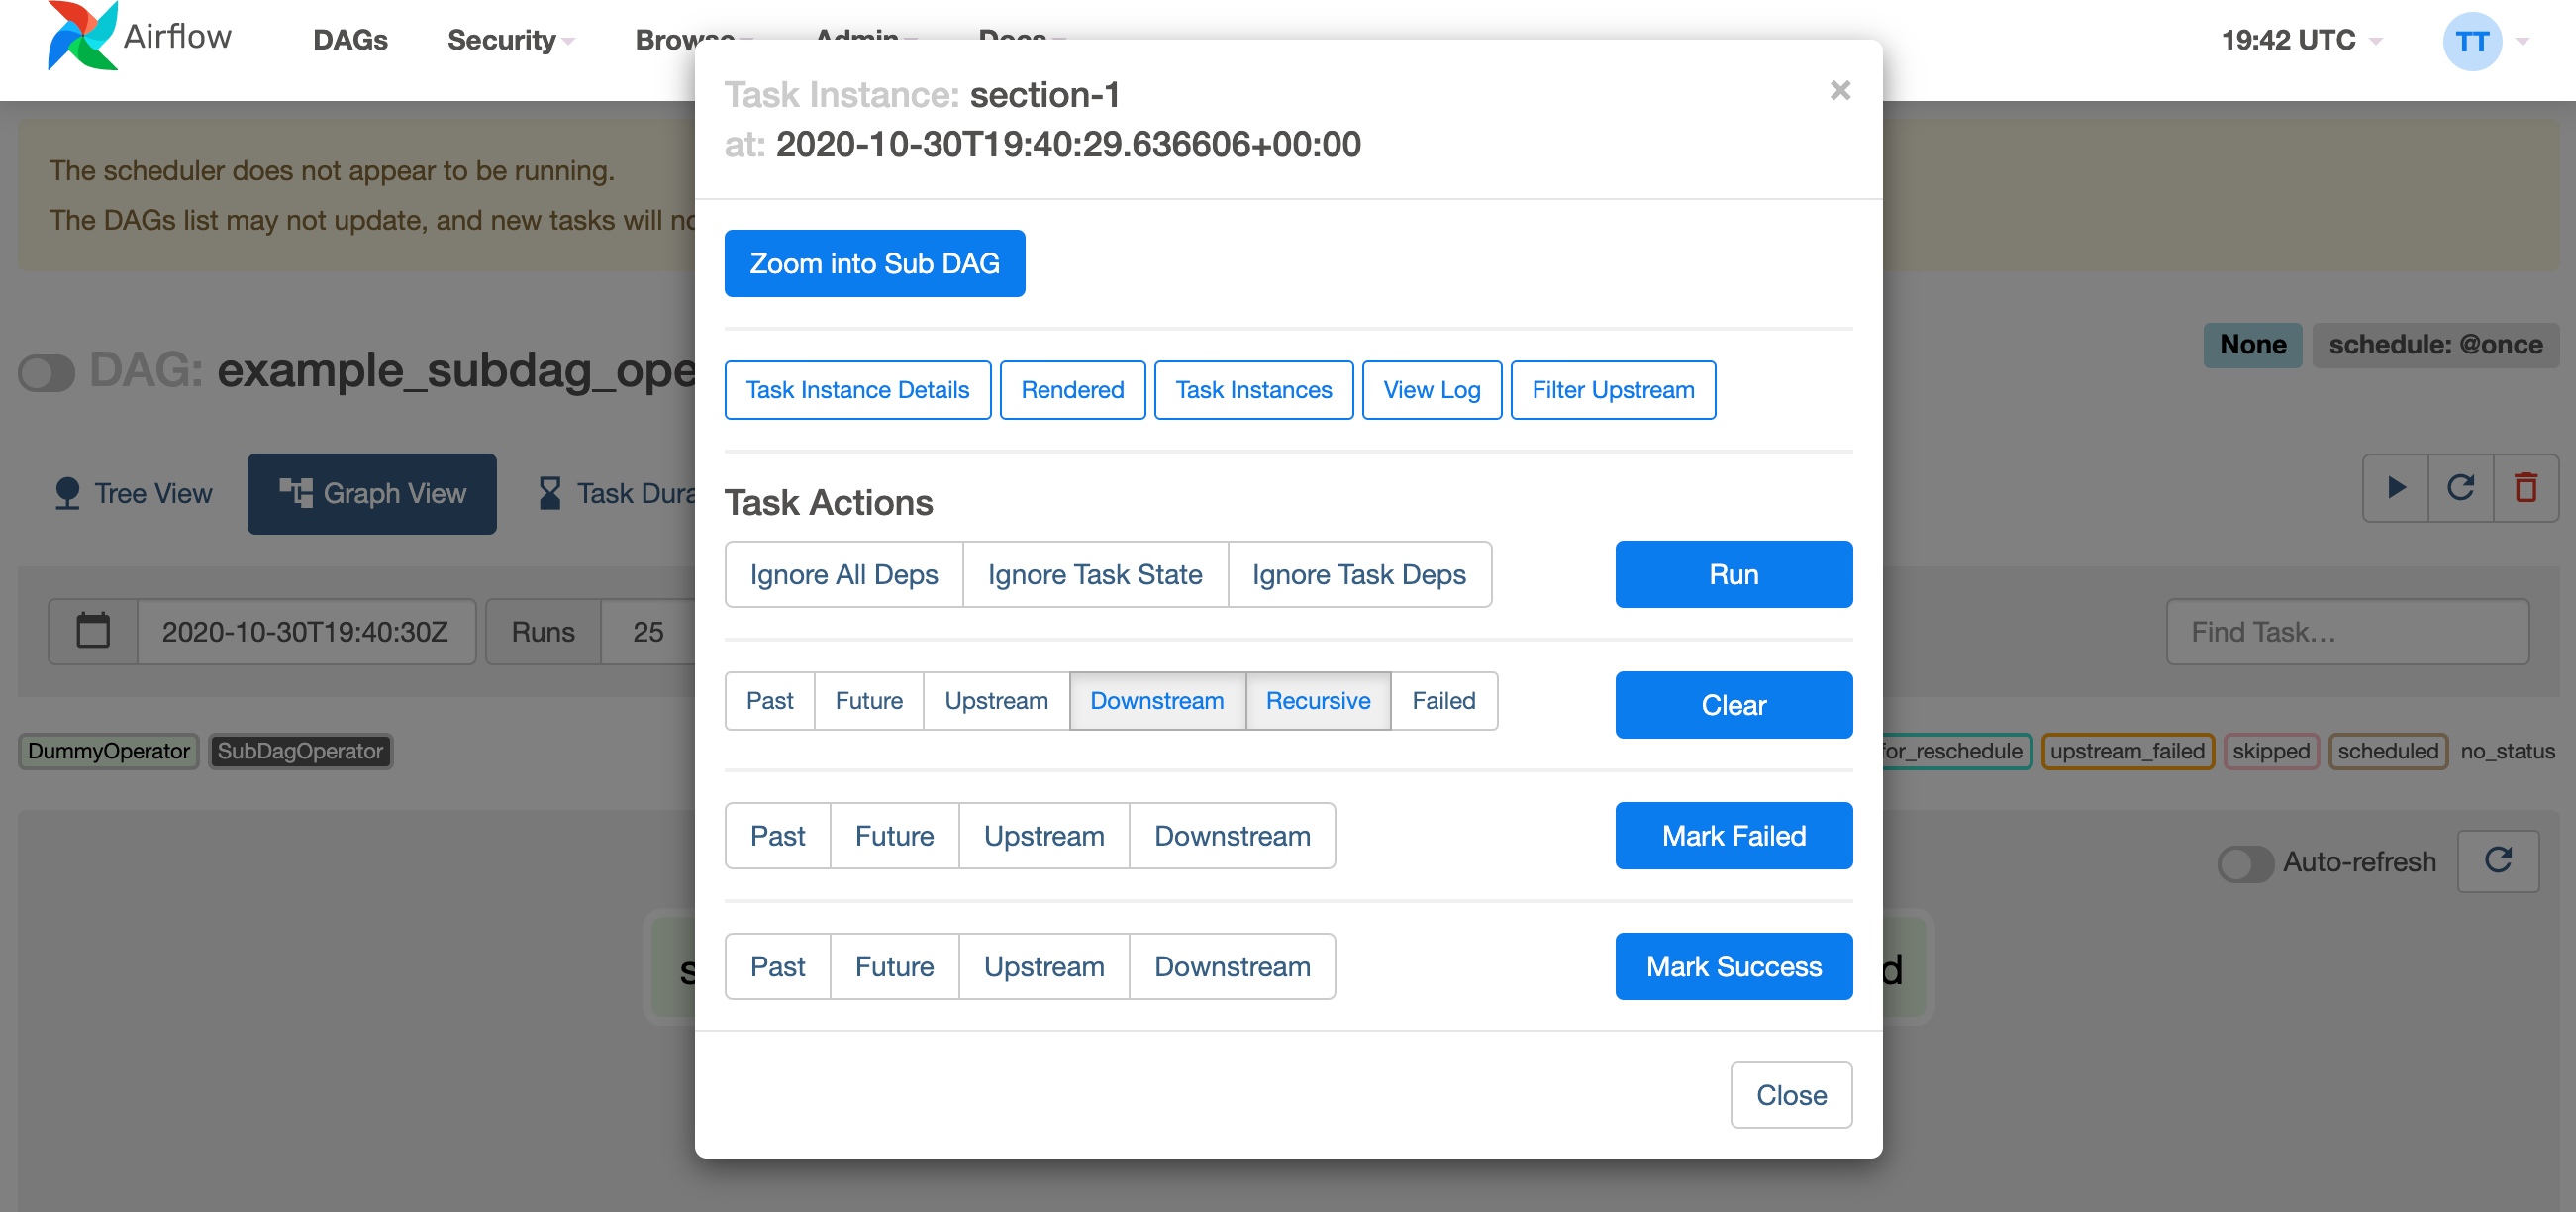
You can zoom into a SubDagOperator from the graph view of the main DAG to show the tasks contained within the SubDAG:
Some other tips when using SubDAGs:
By convention, a SubDAG’s
dag_idshould be prefixed by the name of its parent DAG and a dot (parent.child)You should share arguments between the main DAG and the SubDAG by passing arguments to the SubDAG operator (as demonstrated above)
SubDAGs must have a schedule and be enabled. If the SubDAG’s schedule is set to
Noneor@once, the SubDAG will succeed without having done anything.Clearing a
SubDagOperatoralso clears the state of the tasks within it.Marking success on a
SubDagOperatordoes not affect the state of the tasks within it.Refrain from using Depends On Past in tasks within the SubDAG as this can be confusing.
You can specify an executor for the SubDAG. It is common to use the SequentialExecutor if you want to run the SubDAG in-process and effectively limit its parallelism to one. Using LocalExecutor can be problematic as it may over-subscribe your worker, running multiple tasks in a single slot.
See airflow/example_dags for a demonstration.
Note
Parallelism is not honored by SubDagOperator, and so resources could be consumed by SubdagOperators beyond any limits you may have set.
TaskGroups vs SubDAGs
SubDAGs, while serving a similar purpose as TaskGroups, introduces both performance and functional issues due to its implementation.
The SubDagOperator starts a BackfillJob, which ignores existing parallelism configurations potentially oversubscribing the worker environment.
SubDAGs have their own DAG attributes. When the SubDAG DAG attributes are inconsistent with its parent DAG, unexpected behavior can occur.
Unable to see the “full” DAG in one view as SubDAGs exists as a full fledged DAG.
SubDAGs introduces all sorts of edge cases and caveats. This can disrupt user experience and expectation.
TaskGroups, on the other hand, is a better option given that it is purely a UI grouping concept. All tasks within the TaskGroup still behave as any other tasks outside of the TaskGroup.
You can see the core differences between these two constructs.
TaskGroup |
SubDAG |
|---|---|
Repeating patterns as part of the same DAG |
Repeating patterns as a separate DAG |
One set of views and statistics for the DAG |
Separate set of views and statistics between parent and child DAGs |
One set of DAG configuration |
Several sets of DAG configurations |
Honors parallelism configurations through existing SchedulerJob |
Does not honor parallelism configurations due to newly spawned BackfillJob |
Simple construct declaration with context manager |
Complex DAG factory with naming restrictions |
Note
SubDAG is deprecated hence TaskGroup is always the preferred choice.
Packaging DAGs
While simpler DAGs are usually only in a single Python file, it is not uncommon that more complex DAGs might be spread across multiple files and have dependencies that should be shipped with them (“vendored”).
You can either do this all inside of the DAG_FOLDER, with a standard filesystem layout, or you can package the DAG and all of its Python files up as a single zip file. For instance, you could ship two dags along with a dependency they need as a zip file with the following contents:
my_dag1.py
my_dag2.py
package1/__init__.py
package1/functions.py
Note that packaged DAGs come with some caveats:
They cannot be used if you have picking enabled for serialization
They cannot contain compiled libraries (e.g.
libz.so), only pure PythonThey will be inserted into Python’s
sys.pathand importable by any other code in the Airflow process, so ensure the package names don’t clash with other packages already installed on your system.
In general, if you have a complex set of compiled dependencies and modules, you are likely better off using the Python virtualenv system and installing the necessary packages on your target systems with pip.
.airflowignore
An .airflowignore file specifies the directories or files in DAG_FOLDER
or PLUGINS_FOLDER that Airflow should intentionally ignore. Airflow supports
two syntax flavors for patterns in the file, as specified by the DAG_IGNORE_FILE_SYNTAX
configuration parameter (added in Airflow 2.3): regexp and glob.
Note
The default DAG_IGNORE_FILE_SYNTAX is regexp to ensure backwards compatibility.
For the regexp pattern syntax (the default), each line in .airflowignore
specifies a regular expression pattern, and directories or files whose names (not DAG id)
match any of the patterns would be ignored (under the hood, Pattern.search() is used
to match the pattern). Use the # character to indicate a comment; all characters
on a line following a # will be ignored.
With the glob syntax, the patterns work just like those in a .gitignore file:
The
*character will any number of characters, except/The
?character will match any single character, except/The range notation, e.g.
[a-zA-Z], can be used to match one of the characters in a rangeA pattern can be negated by prefixing with
!. Patterns are evaluated in order so a negation can override a previously defined pattern in the same file or patterns defined in a parent directory.A double asterisk (
**) can be used to match across directories. For example,**/__pycache__/will ignore__pycache__directories in each sub-directory to infinite depth.If there is a
/at the beginning or middle (or both) of the pattern, then the pattern is relative to the directory level of the particular .airflowignore file itself. Otherwise the pattern may also match at any level below the .airflowignore level.
The .airflowignore file should be put in your DAG_FOLDER. For example, you can prepare
a .airflowignore file using the regexp syntax with content
project_a
tenant_[\d]
Or, equivalently, in the glob syntax
**/*project_a*
tenant_[0-9]*
Then files like project_a_dag_1.py, TESTING_project_a.py, tenant_1.py,
project_a/dag_1.py, and tenant_1/dag_1.py in your DAG_FOLDER would be ignored
(If a directory’s name matches any of the patterns, this directory and all its subfolders
would not be scanned by Airflow at all. This improves efficiency of DAG finding).
The scope of a .airflowignore file is the directory it is in plus all its subfolders.
You can also prepare .airflowignore file for a subfolder in DAG_FOLDER and it
would only be applicable for that subfolder.
DAG Dependencies
Added in Airflow 2.1
While dependencies between tasks in a DAG are explicitly defined through upstream and downstream relationships, dependencies between DAGs are a bit more complex. In general, there are two ways in which one DAG can depend on another:
triggering -
TriggerDagRunOperatorwaiting -
ExternalTaskSensor
Additional difficulty is that one DAG could wait for or trigger several runs of the other DAG
with different data intervals. The Dag Dependencies view
Menu -> Browse -> DAG Dependencies helps visualize dependencies between DAGs. The dependencies
are calculated by the scheduler during DAG serialization and the webserver uses them to build
the dependency graph.
The dependency detector is configurable, so you can implement your own logic different than the defaults in
DependencyDetector
DAG pausing, deactivation and deletion
The DAGs have several states when it comes to being “not running”. DAGs can be paused, deactivated and finally all metadata for the DAG can be deleted.
Dag can be paused via UI when it is present in the DAGS_FOLDER, and scheduler stored it in
the database, but the user chose to disable it via the UI. The “pause” and “unpause” actions are available
via UI and API. Paused DAG is not scheduled by the Scheduler, but you can trigger them via UI for
manual runs. In the UI, you can see Paused DAGs (in Paused tab). The DAGs that are un-paused
can be found in the Active tab.
Dag can be deactivated (do not confuse it with Active tag in the UI) by removing them from the
DAGS_FOLDER. When scheduler parses the DAGS_FOLDER and misses the DAG that it had seen
before and stored in the database it will set is as deactivated. The metadata and history of the
DAG` is kept for deactivated DAGs and when the DAG is re-added to the DAGS_FOLDER it will be again
activated and history will be visible. You cannot activate/deactivate DAG via UI or API, this
can only be done by removing files from the DAGS_FOLDER. Once again - no data for historical runs of the
DAG are lost when it is deactivated by the scheduler. Note that the Active tab in Airflow UI
refers to DAGs that are not both Activated and Not paused so this might initially be a
little confusing.
You can’t see the deactivated DAGs in the UI - you can sometimes see the historical runs, but when you try to see the information about those you will see the error that the DAG is missing.
You can also delete the DAG metadata from the metadata database using UI or API, but it does not
always result in disappearing of the DAG from the UI - which might be also initially a bit confusing.
If the DAG is still in DAGS_FOLDER when you delete the metadata, the DAG will re-appear as
Scheduler will parse the folder, only historical runs information for the DAG will be removed.
This all means that if you want to actually delete a DAG and its all historical metadata, you need to do it in three steps:
pause the DAG
delete the historical metadata from the database, via UI or API
delete the DAG file from the
DAGS_FOLDERand wait until it becomes inactive