Amazon Web Services Connection
The Amazon Web Services connection type enables the AWS Integrations.
Authenticating to AWS
Authentication may be performed using any of the boto3 options. Alternatively, one can pass credentials in as a Connection initialisation parameter.
To use IAM instance profile, create an “empty” connection (i.e. one with no Login or Password specified, or
aws://).
Default Connection IDs
The default connection ID is aws_default. If the environment/machine where you are running Airflow has the
file credentials in /home/.aws/, and the default connection has user and pass fields empty, it will take
automatically the credentials from there.
Note
Previously, the aws_default connection had the “extras” field set to {"region_name": "us-east-1"}
on install. This means that by default the aws_default connection used the us-east-1 region.
This is no longer the case and the region needs to be set manually, either in the connection screens in Airflow,
or via the AWS_DEFAULT_REGION environment variable.
Configuring the Connection
- Login (optional)
Specify the AWS access key ID used for the initial connection. If you do an assume_role by specifying a
role_arnin the Extra field, then temporary credentials will be used for subsequent calls to AWS.- Password (optional)
Specify the AWS secret access key used for the initial connection. If you do an assume_role by specifying a
role_arnin the Extra field, then temporary credentials will be used for subsequent calls to AWS.- Extra (optional)
Specify the extra parameters (as json dictionary) that can be used in AWS connection. The following parameters are all optional:
aws_session_token: AWS session token used for the initial connection if you use external credentials. You are responsible for renewing these.role_arn: If specified, then an assume_role will be done to this role.aws_account_id: Used to constructrole_arnif it was not specified.aws_iam_role: Used to constructrole_arnif it was not specified.assume_role_kwargs: Additionalkwargspassed to assume_role.host: Endpoint URL for the connection.region_name: AWS region for the connection.external_id: AWS external ID for the connection (deprecated, rather useassume_role_kwargs).config_kwargs: Additionalkwargsused to construct abotocore.config.Configpassed to boto3.client and boto3.resource.session_kwargs: Additionalkwargspassed to boto3.session.Session.profile: If you are getting your credentials from the credentials file, you can specify the profile with this.
If you are configuring the connection via a URI, ensure that all components of the URI are URL-encoded.
Examples
- Using instance profile:
export AIRFLOW_CONN_AWS_DEFAULT=aws://
This will use boto’s default credential look-up chain (the profile named “default” from the ~/.boto/ config files, and instance profile when running inside AWS)
- With a AWS IAM key pair:
export AIRFLOW_CONN_AWS_DEFAULT=aws://AKIAIOSFODNN7EXAMPLE:wJalrXUtnFEMI%2FK7MDENG%2FbPxRfiCYEXAMPLEKEY@
Note here, that the secret access key has been URL-encoded (changing
/to%2F), and also the trailing@(without which, it is treated as<host>:<port>and will not work)
Examples for the Extra field
Using ~/.aws/credentials and ~/.aws/config file, with a profile.
This assumes all other Connection fields eg Login are empty.
{
  "session_kwargs": {
    "profile_name": "my_profile"
  }
}
Specifying a role_arn to assume and a region_name
{
  "role_arn": "arn:aws:iam::112223334444:role/my_role",
  "region_name": "ap-southeast-2"
}
See also
https://docs.aws.amazon.com/IAM/latest/UserGuide/id_credentials_temp_request.html#api_assumerole
Configuring an outbound HTTP proxy
{
  "config_kwargs": {
    "proxies": {
      "http": "http://myproxy.mycompany.local:8080",
      "https": "http://myproxy.mycompany.local:8080"
    }
  }
}
Using AssumeRoleWithSAML
{
  "region_name":"eu-west-1",
  "role_arn":"arn:aws:iam::112223334444:role/my_role",
  "assume_role_method":"assume_role_with_saml",
  "assume_role_with_saml":{
    "principal_arn":"arn:aws:iam::112223334444:saml-provider/my_saml_provider",
    "idp_url":"https://idp.mycompany.local/.../saml/clients/amazon-aws",
    "idp_auth_method":"http_spegno_auth",
    "mutual_authentication":"OPTIONAL",
    "idp_request_kwargs":{
      "headers":{"Accept": "text/html,application/xhtml+xml,application/xml;q=0.9,*/*;q=0.8"},
      "verify":false
    },
    "idp_request_retry_kwargs": {
      "total": 10,
      "backoff_factor":1,
      "status":10,
      "status_forcelist": [400, 429, 500, 502, 503, 504]
    },
    "log_idp_response":false,
    "saml_response_xpath":"////INPUT[@NAME='SAMLResponse']/@VALUE",
  },
  "assume_role_kwargs": { "something":"something" }
}
The following settings may be used within the assume_role_with_saml container in Extra.
principal_arn: The ARN of the SAML provider created in IAM that describes the identity provider.
idp_url: The URL to your IDP endpoint, which provides SAML Assertions.
idp_auth_method: Specify “http_spegno_auth” to use the Pythonrequests_gssapilibrary. This library is more up to date thanrequests_kerberosand is backward compatible. Seerequests_gssapidocumentation on PyPI.
mutual_authentication: Can be “REQUIRED”, “OPTIONAL” or “DISABLED”. Seerequests_gssapidocumentation on PyPI.
idp_request_kwargs: Additionalkwargspassed torequestswhen requesting from the IDP (over HTTP/S).
idp_request_retry_kwargs: Additionalkwargsto construct aurllib3.util.Retryused as a retry strategy when requesting from the IDP. See theurllib3documentation for more details.
log_idp_response: Useful for debugging - if specified, print the IDP response content to the log. Note that a successful response will contain sensitive information!
saml_response_xpath: How to query the IDP response using XML / HTML xpath.
assume_role_kwargs: Additionalkwargspassed tosts_client.assume_role_with_saml.
Note
The requests_gssapi library is used to obtain a SAML response from your IDP.
You may need to pip uninstall python-gssapi and pip install gssapi instead for this to work.
The python-gssapi library is outdated, and conflicts with some versions of paramiko which Airflow uses elsewhere.
Session Factory
The default BaseSessionFactory for the connection can handle most of the authentication methods for AWS.
In the case that you would like to have full control of
boto3 session creation or
you are using custom federation that requires
external process to source the credentials,
you can subclass BaseSessionFactory and override create_session
and/or _create_basic_session method depending on your needs.
You will also need to add configuration for AwsBaseHook to use the custom implementation by their full path.
Example
- Configuration:
[aws]
session_factory = my_company.aws.MyCustomSessionFactory
- Connection extra field:
{
  "federation": {
    "username": "my_username",
    "password": "my_password"
  }
}
- Custom Session Factory:
def get_federated_aws_credentials(username: str, password: str):
    """
    Mock interaction with federation endpoint/process and returns AWS credentials.
    """
    return {
        "Version": 1,
        "AccessKeyId": "key",
        "SecretAccessKey": "secret",
        "SessionToken": "token",
        "Expiration": "2050-12-31T00:00:00.000Z",
    }


class MyCustomSessionFactory(BaseSessionFactory):
    @property
    def federated(self):
        return "federation" in self.extra_config

    def _create_basic_session(
        self, session_kwargs: Dict[str, Any]
    ) -> boto3.session.Session:
        if self.federated:
            return self._create_federated_session(session_kwargs)
        else:
            return super()._create_basic_session(session_kwargs)

    def _create_federated_session(
        self, session_kwargs: Dict[str, Any]
    ) -> boto3.session.Session:
        username = self.extra_config["federation"]["username"]
        region_name = self._get_region_name()
        self.log.debug(
            f"Creating federated session with username={username} region_name={region_name} for "
            f"connection {self.conn.conn_id}"
        )
        credentials = RefreshableCredentials.create_from_metadata(
            metadata=self._refresh_federated_credentials(),
            refresh_using=self._refresh_federated_credentials,
            method="custom-federation",
        )
        session = botocore.session.get_session()
        session._credentials = credentials
        session.set_config_variable("region", region_name)
        return boto3.session.Session(botocore_session=session, **session_kwargs)

    def _refresh_federated_credentials(self) -> Dict[str, str]:
        self.log.debug("Refreshing federated AWS credentials")
        credentials = get_federated_aws_credentials(**self.extra_config["federation"])
        access_key_id = credentials["AccessKeyId"]
        expiry_time = credentials["Expiration"]
        self.log.info(
            f"New federated AWS credentials received with aws_access_key_id={access_key_id} and "
            f"expiry_time={expiry_time} for connection {self.conn.conn_id}"
        )
        return {
            "access_key": access_key_id,
            "secret_key": credentials["SecretAccessKey"],
            "token": credentials["SessionToken"],
            "expiry_time": expiry_time,
        }
Google Cloud to AWS authentication using Web Identity Federation
Thanks to Web Identity Federation, you can use the credentials from the Google Cloud platform to authorize access in the Amazon Web Service platform. If you additionally use authorizations with access token obtained from metadata server or Workload Identity, you can improve the security of your environment by eliminating long-lived credentials.
The Google Cloud credentials is exchanged for the Amazon Web Service temporary credentials by AWS Security Token Service.
The following diagram illustrates a typical communication flow used to obtain the AWS credentials.
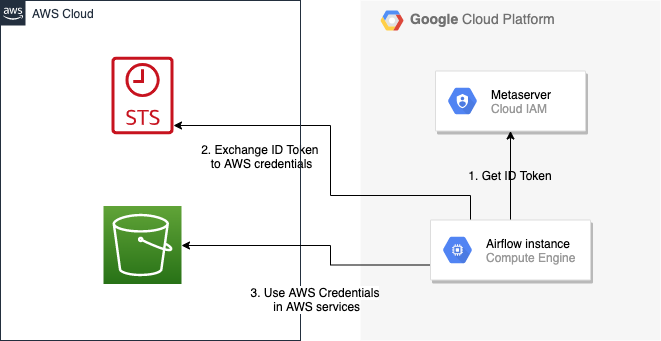
Communication Flow Diagram
Role setup
In order for a Google identity to be recognized by AWS, you must configure roles in AWS.
You can do it by using the role wizard or by using the Terraform.
Role wizard
To create an IAM role for web identity federation:
Sign in to the AWS Management Console and open the IAM console at https://console.aws.amazon.com/iam/.
In the navigation pane, choose Roles and then choose Create role.
Choose the Web identity role type.
For Identity provider, choose the Google.
Type the service account email address (in the form
<NAME>@<PROJECT_ID>.iam.gserviceaccount.com) into the Audience box.Review your web identity information and then choose Next: Permissions.
Select the policy to use for the permissions policy or choose Create policy to open a new browser tab and create a new policy from scratch. For more information, see Creating IAM Policy.
Choose Next: Tags.
(Optional) Add metadata to the role by attaching tags as key–value pairs. For more information about using tags in IAM, see Tagging IAM users and roles.
Choose Next: Review.
For Role name, type a role name. Role names must be unique within your AWS account.
(Optional) For Role description, type a description for the new role.
Review the role and then choose Create role.
For more information, see: Creating a role for web identity or OpenID connect federation (console)
Finally, you should get a role that has a similar policy to the one below:
{
  "Version": "2012-10-17",
  "Statement": [
    {
      "Effect": "Allow",
      "Principal": {
        "Federated": "accounts.google.com"
      },
      "Action": "sts:AssumeRoleWithWebIdentity",
      "Condition": {
        "StringEquals": {
          "accounts.google.com:aud": "<NAME>@<PROJECT_ID>.iam.gserviceaccount.com"
        }
      }
    }
  ]
}
In order to protect against the misuse of the Google OpenID token, you can also limit the scope of use by configuring restrictions per audience. You will need to configure the same value for the connection, and then this value also included in the ID Token. AWS will test if this value matches. For that, you can add a new condition to the policy.
{
  "Condition": {
    "StringEquals": {
      "accounts.google.com:aud": "<NAME>@<PROJECT_ID>.iam.gserviceaccount.com",
      "accounts.google.com:oaud": "service-amp.my-company.com"
    }
  }
}
After creating the role, you should configure the connection in Airflow.
Terraform
In order to quickly configure a new role, you can use the following Terraform script, which configures
AWS roles along with the assigned policy.
Before using it, you need correct the variables in the locals section to suit your environment:
google_service_account- The email address of the service account that will have permission to use this rolegoogle_openid_audience- Constant value that is configured in the Airflow role and connection. It prevents misuse of the Google ID token.aws_role_name- The name of the new AWS role.aws_policy_name- The name of the new AWS policy.
For more information on using Terraform scripts, see: Terraform docs - Get started - AWS
After executing the plan, you should configure the connection in Airflow.
Connection setup
In order to use a Google identity, field "assume_role_method" must be "assume_role_with_web_identity" and
field "assume_role_with_web_identity_federation" must be "google" in the extra section
of the connection setup. It also requires that you set up roles in the "role_arn" field.
Optionally, you can limit the use of the Google Open ID token by configuring the
"assume_role_with_web_identity_federation_audience" field. The value of these fields must match the value configured in the role.
Airflow will establish Google’s credentials based on the Application Default Credentials.
Below is an example connection configuration.
{
  "role_arn": "arn:aws:iam::240057002457:role/WebIdentity-Role",
  "assume_role_method": "assume_role_with_web_identity",
  "assume_role_with_web_identity_federation": "google",
  "assume_role_with_web_identity_federation_audience": "service_a.apache.com"
}
You can configure connection, also using environmental variable AIRFLOW_CONN_{CONN_ID}.
export AIRFLOW_CONN_AWS_DEFAULT="aws://\
?role_arn=arn%3Aaws%3Aiam%3A%3A240057002457%3Arole%2FWebIdentity-Role&\
assume_role_method=assume_role_with_web_identity&\
assume_role_with_web_identity_federation=google&\
assume_role_with_web_identity_federation_audience=aaa.polidea.com"
Using IAM Roles for Service Accounts (IRSA) on EKS
If you are running Airflow on Amazon EKS, you can grant AWS related permission (such as S3 Read/Write for remote logging) to the Airflow service by granting the IAM role to it’s service account. To activate this, the following steps must be followed:
Create an IAM OIDC Provider on EKS cluster.
Create an IAM Role and Policy to attach to the Airflow service account with web identity provider created at 1.
Add the corresponding IAM Role to the Airflow service account as an annotation.
Then you can find AWS_ROLE_ARN and AWS_WEB_IDENTITY_TOKEN_FILE in environment variables of appropriate pods that Amazon EKS Pod Identity Web Hook added. Then boto3 will configure credentials using those variables.
In order to use IRSA in Airflow, you have to create an aws connection with all fields empty. If a field such as role-arn is set, Airflow does not follow the boto3 default flow because it manually create a session using connection fields. If you did not change the default connection ID, an empty AWS connection named aws_default would be enough.